Imaging and Born Digital Content Acquisition Procedures
On this page
- Imaging and Born Digital Content Acquisition Procedures
Format Workflows
All workflows in this document assume a collection or accession has been formally received by the West Virginia & Regional History Center and is accompanied by a Deed of Gift or Loan. Ideally, all materials will have an accession number and, if applicable, an A&M number. If an item or set of items does not have an accession number, talk to the Accessioning Archivist.
The DVD, CD, IsoBuster, and FTK Imager workflows are greatly informed by Annie Schweikert’s work on optical media at NYU.
Digital Transfer
Sometimes donors have a limited quantity of content and would like to transfer their materials exclusively digitally rather than via a hard drive or other physical media. Depending on the quantity, this transfer may be via email or a file share such as Box, OneDrive, or Google Drive.
The following workflows outlines two transfer methods: Ideal and Acceptable.
- The Ideal method is best for donors with technical expertise or content that is highly valuable and needs to retain as much built-in metadata as possible.
- The Acceptable method is best for donors with limited technical expertise or content that only needs to maintain most metadata.
Donor Guidance
Ideal Workflow
This section outlines an ideal workflow for donors with moderate technical expertise who are donating highly valuable content.
A workflow using Bagger is in-progress
Acceptable Workflow
This workflow requires minimal technical expertise and maintains most metadata. The instructions below can be forwarded directly to donors.
Windows Users
- Locate the file or folder that you want to zip.
- Right-click the file or folder, click “Send to” in the menu that pops up, and then select “Compressed (zipped) folder.”
- Name the compressed folder something that is descriptive of the content—such as including your name and the date of the transfer.
- If the compressed item is small enough to email, attach it and email it to the archivist you’ve been working with. If it is too large, upload it to the link provided to you by the archivist and let the archivist know you’ve uploaded it.
- Note: the Archivist receiving the materials must create a folder in OneDrive that has edit permissions for non-WVU users. The URL for this folder should then be sent to the donor.
Apple Users
- Locate the file or folder that you want to zip.
- Control-click it or tap it using two fingers, then choose Compress from the shortcut menu.
- If you compress a single item, the compressed file has the name of the original item with the .zip extension. If you compress multiple items at once, the compressed file is called Archive.zip. Rename the compressed folder something that is descriptive of the content—such as including your name and the date of the transfer.
- If the compressed item is small enough to email, attach it and email it to the archivist you’ve been working with. If it is too large, upload it to the link provided to you by the archivist and let the archivist know you’ve uploaded it.
- Note: the Archivist receiving the materials must create a folder in OneDrive that has edit permissions for non-WVU users. The URL for this folder should then be sent to the donor.
Procedures Upon Arrival to WVRHC
- Once the content has been deposited to a shared space or sent via email, add information about the transfer to the digital media inventory for the collection or accession, found in the Administration folder for the collection or accession. If there is no folder for the collection or accession, consult the Born-Digital Materials Accessioning procedures to create a folder.
- Create two folders on the desktop using the media item’s identifier identified in the digital media inventory: identifier_content and identifier_metadata. The word “identifier” should be the identifier for the item, not the word identifier. Example: 2828_disc_1_content
- Download the .zip file to your desktop.
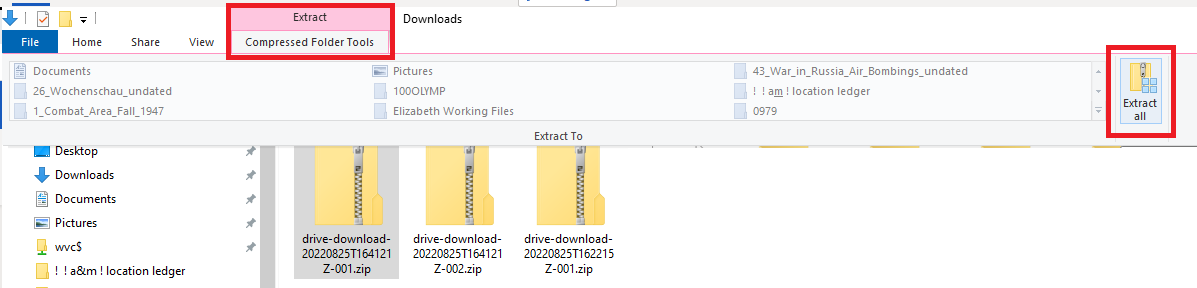
Unzip the file by selecting the .zip file, clicking the Extract/Compressed Folder Tools (boxed in red on the left) option on the toolbar at the top and then selecting Extract All. Extract the content to the identifier_content folder on the desktop.
- Run the following command on the command line, being sure that the input directory is the identifier_content folder and the output directory is the identifier_metadata folder.
brunnhilde.py -b -z --ssn_mode=2 [input directory, or content folder for item] [output directory, or File Metadata folder for item]- Example:
brunnhilde.py -b -z --ssn_mode=2 C:\Working Files\2828_disc_1_content C:\Working Files\2828_disc_1_metadata - Note: if an item is flagged as a virus by ClamAV (visible on the command line output), contact the Digital Archivist with the identifier for the item and immediately delete all content on the desktop and empty the Recycling Bin. Update the PREMIS spreadsheet in the Administrative folder within the folder for the collection or accession to include the event of Quarantine (if necessary) for the item. Do not continue to any additional steps.
- Move the identifier_content folder to the Content folder for the collection or accession and the identifier_metadata folder to the Metadata folder within the Administration folder within the accession or collection folder using the TeraCopy instructions. Remove _content and _metadata from the folder names.
- Update the PREMIS spreadsheet in the Administrative folder within the folder for the collection or accession to include the events for Brunnhilde report, Replication, and/or Quarantine (if necessary) for the item.
CDs and DVDs
The method of extracting content from CDs and DVDs varies depending on the format and method of saving data on the disc. For instance, CD-DA, or compact disk digital audio, has a higher error rate and therefore requires specialized software for transferring files. A disk image will copy with a higher rate of error due to the format. Optical media may require multiple attempts to accurately acquire content, possibly using multiple drives to access content.
To determine what type of CD or DVD you have to select from the CD-DA or All Other CD and DVD Formats workflows, follow the Identifying the Format of a Disc instructions. Then, follow the instructions in the applicable section.
If content acquisition for an item is unsuccessful or duplicate media items within a single collection are present, forward the identifiers for these materials to the Digital Archivist.
CD-DA
| Software | Hardware |
|---|---|
| Exact Audio Copy, Teracopy, Brunnhilde | External CD/DVD drive, internal CD/DVD drive |
- Insert the disc into the external USB CD/DVD drive.
- Create two folders on the desktop using the media item’s identifier identified in the digital media inventory: identifier_content and identifier_metadata. The word “identifier” should be the identifier for the item, not the word identifier. Example: 2828_disc_1_content
- Follow the Exact Audio Copy instructions.
- Once all content has been transferred to the identifier_content and identifier_metadata folders, run the following command on the command line, being sure that the input directory is the identifier_content folder and the output directory is the identifier_metadata folder.
brunnhilde.py -b -z --ssn_mode=2 [input directory, or content folder for item] [output directory, or File Metadata folder for item]- Example:
brunnhilde.py -b -z --ssn_mode=2 C:\Working Files\2828_disc_1_content C:\Working Files\2828_disc_1_metadata - Note: if an item is flagged as a virus by ClamAV (visible on the command line output), contact the Digital Archivist with the identifier for the item and immediately delete all content on the desktop and empty the Recycling Bin. Update the PREMIS spreadsheet in the Administrative folder within the folder for the collection or accession to include the event of Quarantine (if necessary) for the item. Do not continue to any additional steps.
- Move the identifier_content folder to the Content folder for the collection or accession and the identifier_metadata folder to the Metadata folder within the Administration folder within the accession or collection folder using the TeraCopy instructions. Remove _content and _metadata from the folder names.
- Update the PREMIS spreadsheet in the Administrative folder within the folder for the collection or accession to include the events for Brunnhilde report, Replication, and/or Quarantine (if necessary) for the item.
All Other CD and DVD Formats
| Software | Hardware |
|---|---|
| Teracopy, optionally FTK Imager, Brunnhilde, IsoBuster | External CD/DVD drive, internal CD/DVD drive |
- Insert the disc into the external USB CD/DVD drive.
- Create two folders on the desktop using the media item’s identifier identified in the digital media inventory: identifier_content and identifier_metadata. The word “identifier” should be the identifier for the item, not the word identifier. Example: 2828_disc_1_content
- Next, examine the contents of the disc without opening any files. To access the content of the disc via Windows Explorer, go to File Explorer->This PC->Devices and Drives and select the relevant drive by right clicking on the device or drive and selecting Open in New Window. Examine the disc in IsoBuster by following Viewing a Disk Image or Media Item in IsoBuster instructions.
- If the disc:
- Has multiple sessions (visible in IsoBuster)
- Has Mac file systems such as Hierarchical File System Plus (HFS+), Hierarchical File System (HFS), or Macintosh File System (MFS)
- Has content that is different in Isobuster and Windows Explorer
Use the FTK Imager instructions to image the disc. For items formatted with multiple drives, be sure to capture each sub-drive with the FTK Imager instructions to image the item.
If the disc:
- Is a DVD video disc (which consists of a folder titled VIDEO_TS as the primary/only content)
Use the Isobuster Imaging an Item instructions.
Otherwise, if the content is identical in all file systems in Windows Explorer vs. IsoBuster, follow the Teracopy instructions to copy all items from the disc to the identifier_content folder on the desktop. If the content does not match, follow the FTK Imager instructions for content extraction to accomplish the same task.
- Once all content is in the identifier_content folder, run the following command on the command line, being sure that the input directory is the identifier_content folder and the output directory is the identifier_metadata folder.
brunnhilde.py -b -z --ssn_mode=2 [input directory, or content folder for item] [output directory, or File Metadata folder for item]- Example:
brunnhilde.py -b -z --ssn_mode=2 C:\Working Files\2828_disc_1_content C:\Working Files\2828_disc_1_metadata - Note: if an item is flagged as a virus by ClamAV (visible on the command line output), contact the Digital Archivist with the identifier for the item and immediately delete all content on the desktop and empty the Recycling Bin. Update the PREMIS spreadsheet in the Administrative folder within the folder for the collection or accession to include the event of Quarantine (if necessary) for the item. Do not continue to any additional steps.
- Move the identifier_content folder to the Content folder for the collection or accession and the identifier_metadata folder to the Metadata folder within the Administration folder within the accession or collection folder using the TeraCopy instructions. Remove _content and _metadata from the folder names.
- Update the PREMIS spreadsheet in the Administrative folder within the folder for the collection or accession to include the events for Brunnhilde report, Imaging (if necessary), Replication (if necessary), and/or Quarantine (if necessary) for the item.
3.5 Inch Floppy Disks
Floppy disks are a notoriously temperamental format. Exploration of other hardware and software for imaging floppy disks, such as those used by KryoFlux or usage of a contemporary 3.5 inch floppy drive, may be explored in the future to improve content capture results. This workflow is meant to serve as an initial “first pass” for floppy disks in WVRHC collections.
If content acquisition for an item is unsuccessful or duplicate media items within a single collection are present, forward the identifiers for these materials to the Digital Archivist.
| Software | Hardware |
|---|---|
| FTK Imager, IsoBuster, Brunnhilde, TeraCopy | USB floppy drive, Mitsubi legacy drive |
Write protect the floppy disk by sliding the tab to uncover the hole on the corner of the floppy disk opposite the shutter. An example of the write protected position can be seen in the top left zoomed in image below.
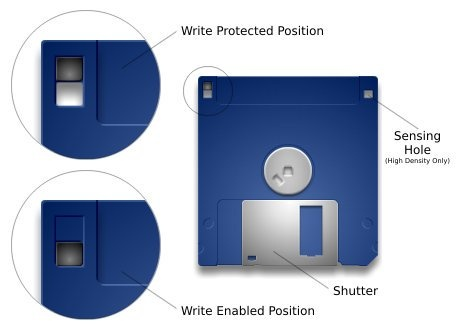
Image from 3.5" Floppy Disks
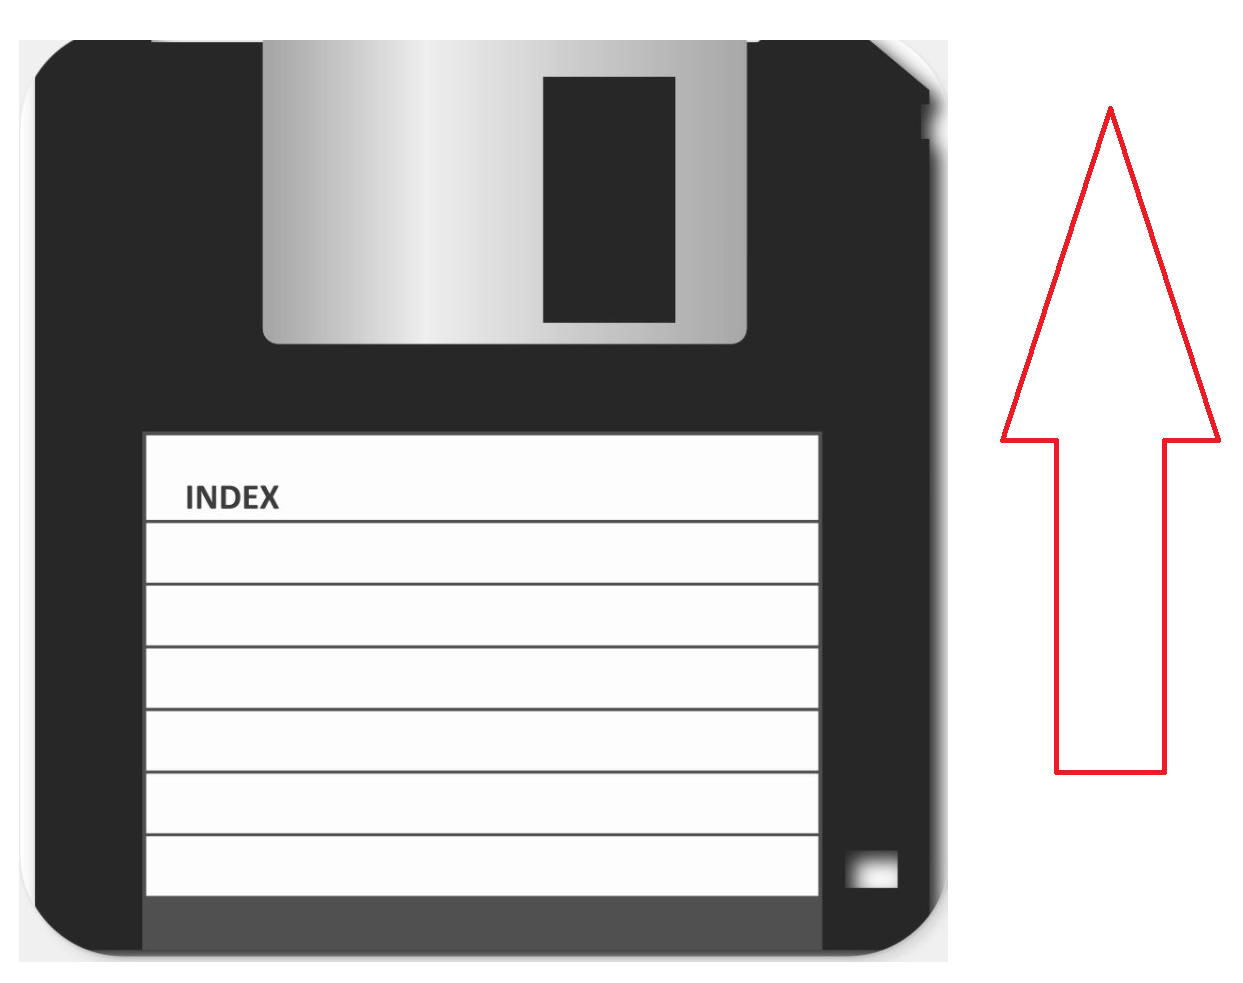
Plug in the USB floppy disk drive. Insert the floppy disk into the drive with the label side up and metal bracket first, as seen in the following image.
- Create two folders on the desktop using the media item’s identifier identified in the digital media inventory: identifier_content and identifier_metadata. The word “identifier” should be the identifier for the item, not the word identifier. Example: 2828_disc_1_content
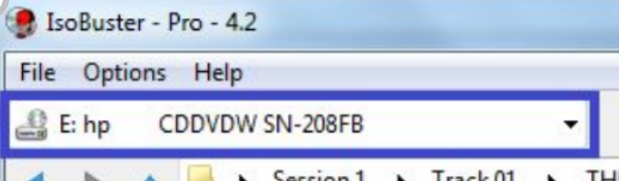
Open IsoBuster. Use the dropdown in the upper left corner (shown boxed in blue below) to select the correct drive. For floppy disks this is usually the A: drive.
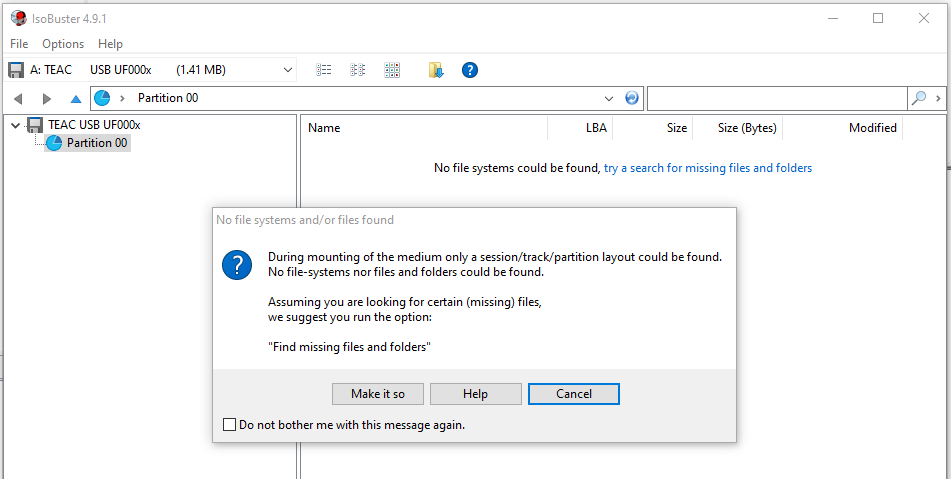
Once the A: or other relevant drive is selected, IsoBuster will begin to read the item. If you see a list of files and/or file systems appear on the left pane (example below of a DVD), follow FTK Imager instructions to image the disk and skip to the “If content was retrievable” section after step 6.
If you see the below popup instead, skip to the “If content was unretrievable” section after this step.
If content was retrievable:
- Once all content is in the identifier_content folder, run the following command on the command line, being sure that the input directory is the identifier_content folder and the output directory is the identifier_metadata folder.
brunnhilde.py -b -z --ssn_mode=2 [input directory, or content folder for item] [output directory, or File Metadata folder for item]- Example:
brunnhilde.py -b -z --ssn_mode=2 C:\Working Files\2828_disc_1_content C:\Working Files\2828_disc_1_metadata - Note: if an item is flagged as a virus by ClamAV (visible on the command line output), contact the Digital Archivist with the identifier for the item and immediately delete all content on the desktop and empty the Recycling Bin. Update the PREMIS spreadsheet in the Administrative folder within the folder for the collection or accession to include the event of Quarantine (if necessary) for the item. Do not continue to any additional steps.
- Move the identifier_content folder to the Content folder for the collection or accession and the identifier_metadata folder to the Metadata folder within the Administration folder within the accession or collection folder using the TeraCopy instructions. Remove _content and _metadata from the folder names.
- Update the PREMIS spreadsheet in the Administrative folder within the folder for the collection or accession to include the events for Brunnhilde report, Imaging, and/or Quarantine (if necessary) for the item.
If content was unretrievable:
If content acquisition for an item is unsuccessful, record a failure for the Imaging event in the PREMIS spreadsheet.
5.25 Inch Floppy Disks
The WVRHC does not have a case available for the 5.25 inch floppy disk drive and uses it upside down, as is similarly documented at the University of Michigan.
| Software | Hardware |
|---|---|
| FC5025 (command line), Apple Commander, FTK Imager, Brunnhilde, Teracopy | TEAC 5.25 in drive, FC5025 Floppy Controller, SATA and IDE adapter |
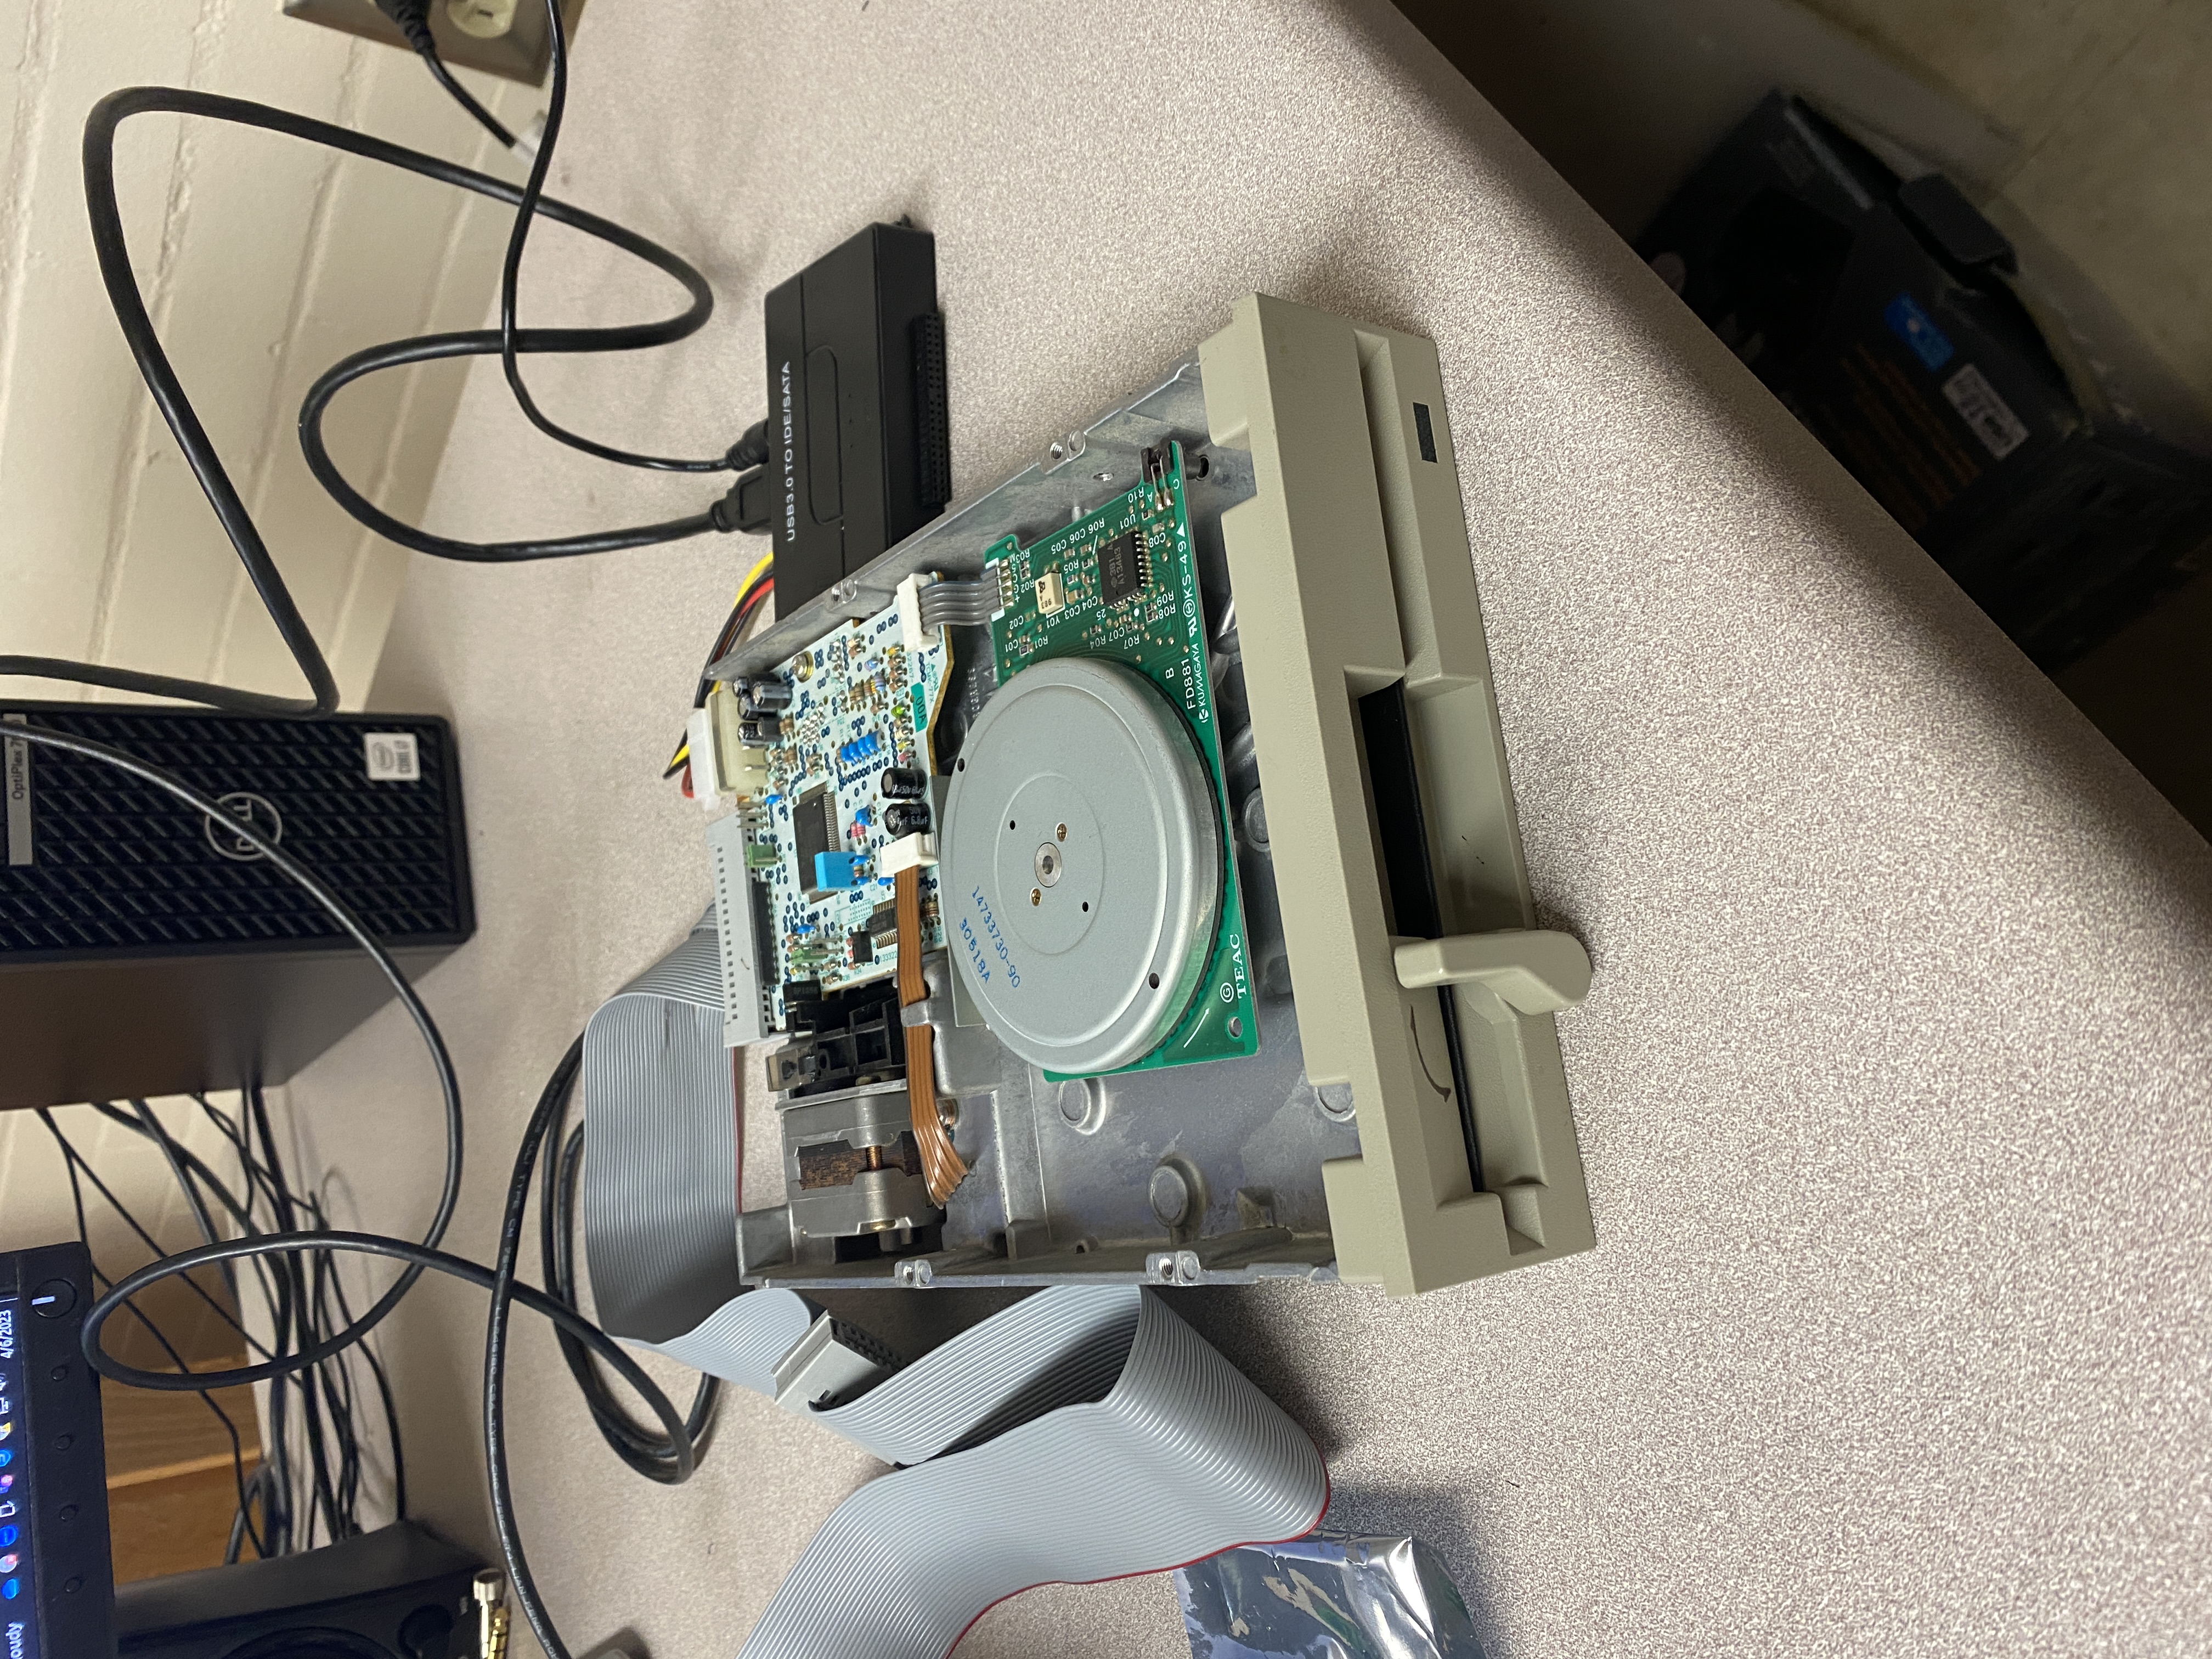
- Set up the TEAC drive, FC5025 Floppy Controller, and SATA and IDE adapter as seen below.
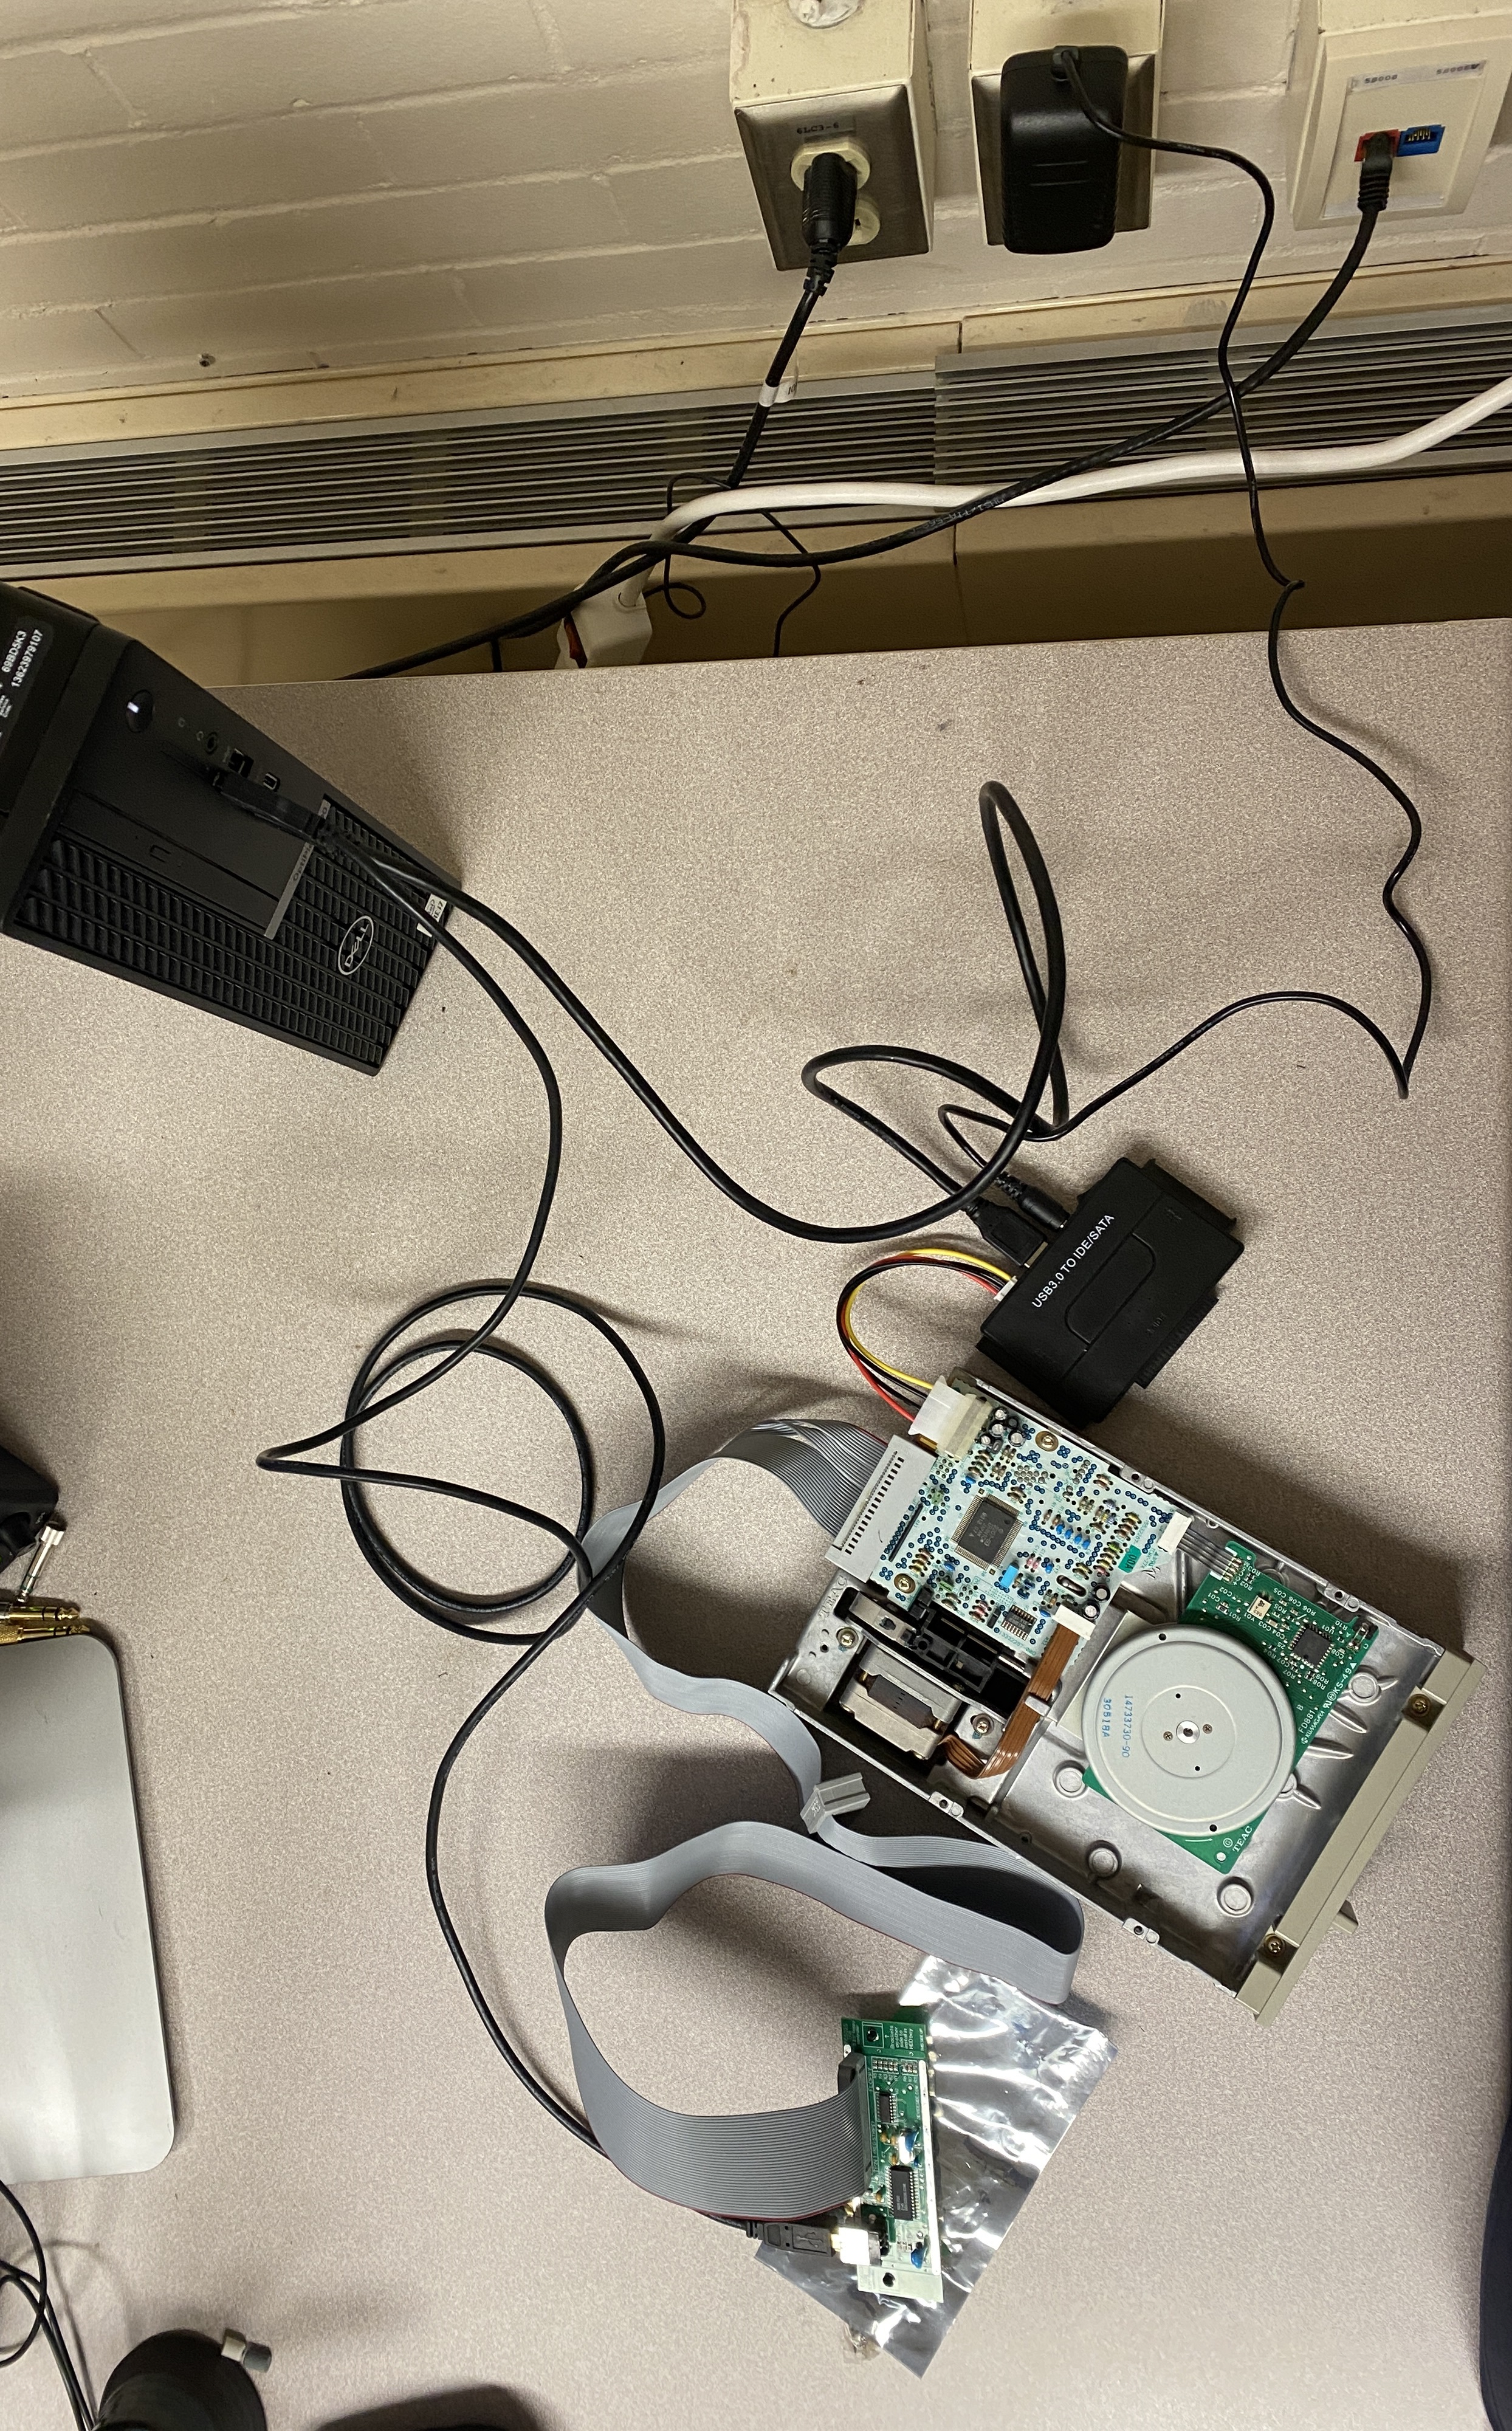
- Create two folders on the desktop using the media item’s identifier identified in the digital media inventory: identifier_content and identifier_metadata. The word “identifier” should be the identifier for the item, not the word identifier. Example: 2828_5_25_fdisk_01
- Insert the item into the drive, oriented as seen in the image below:
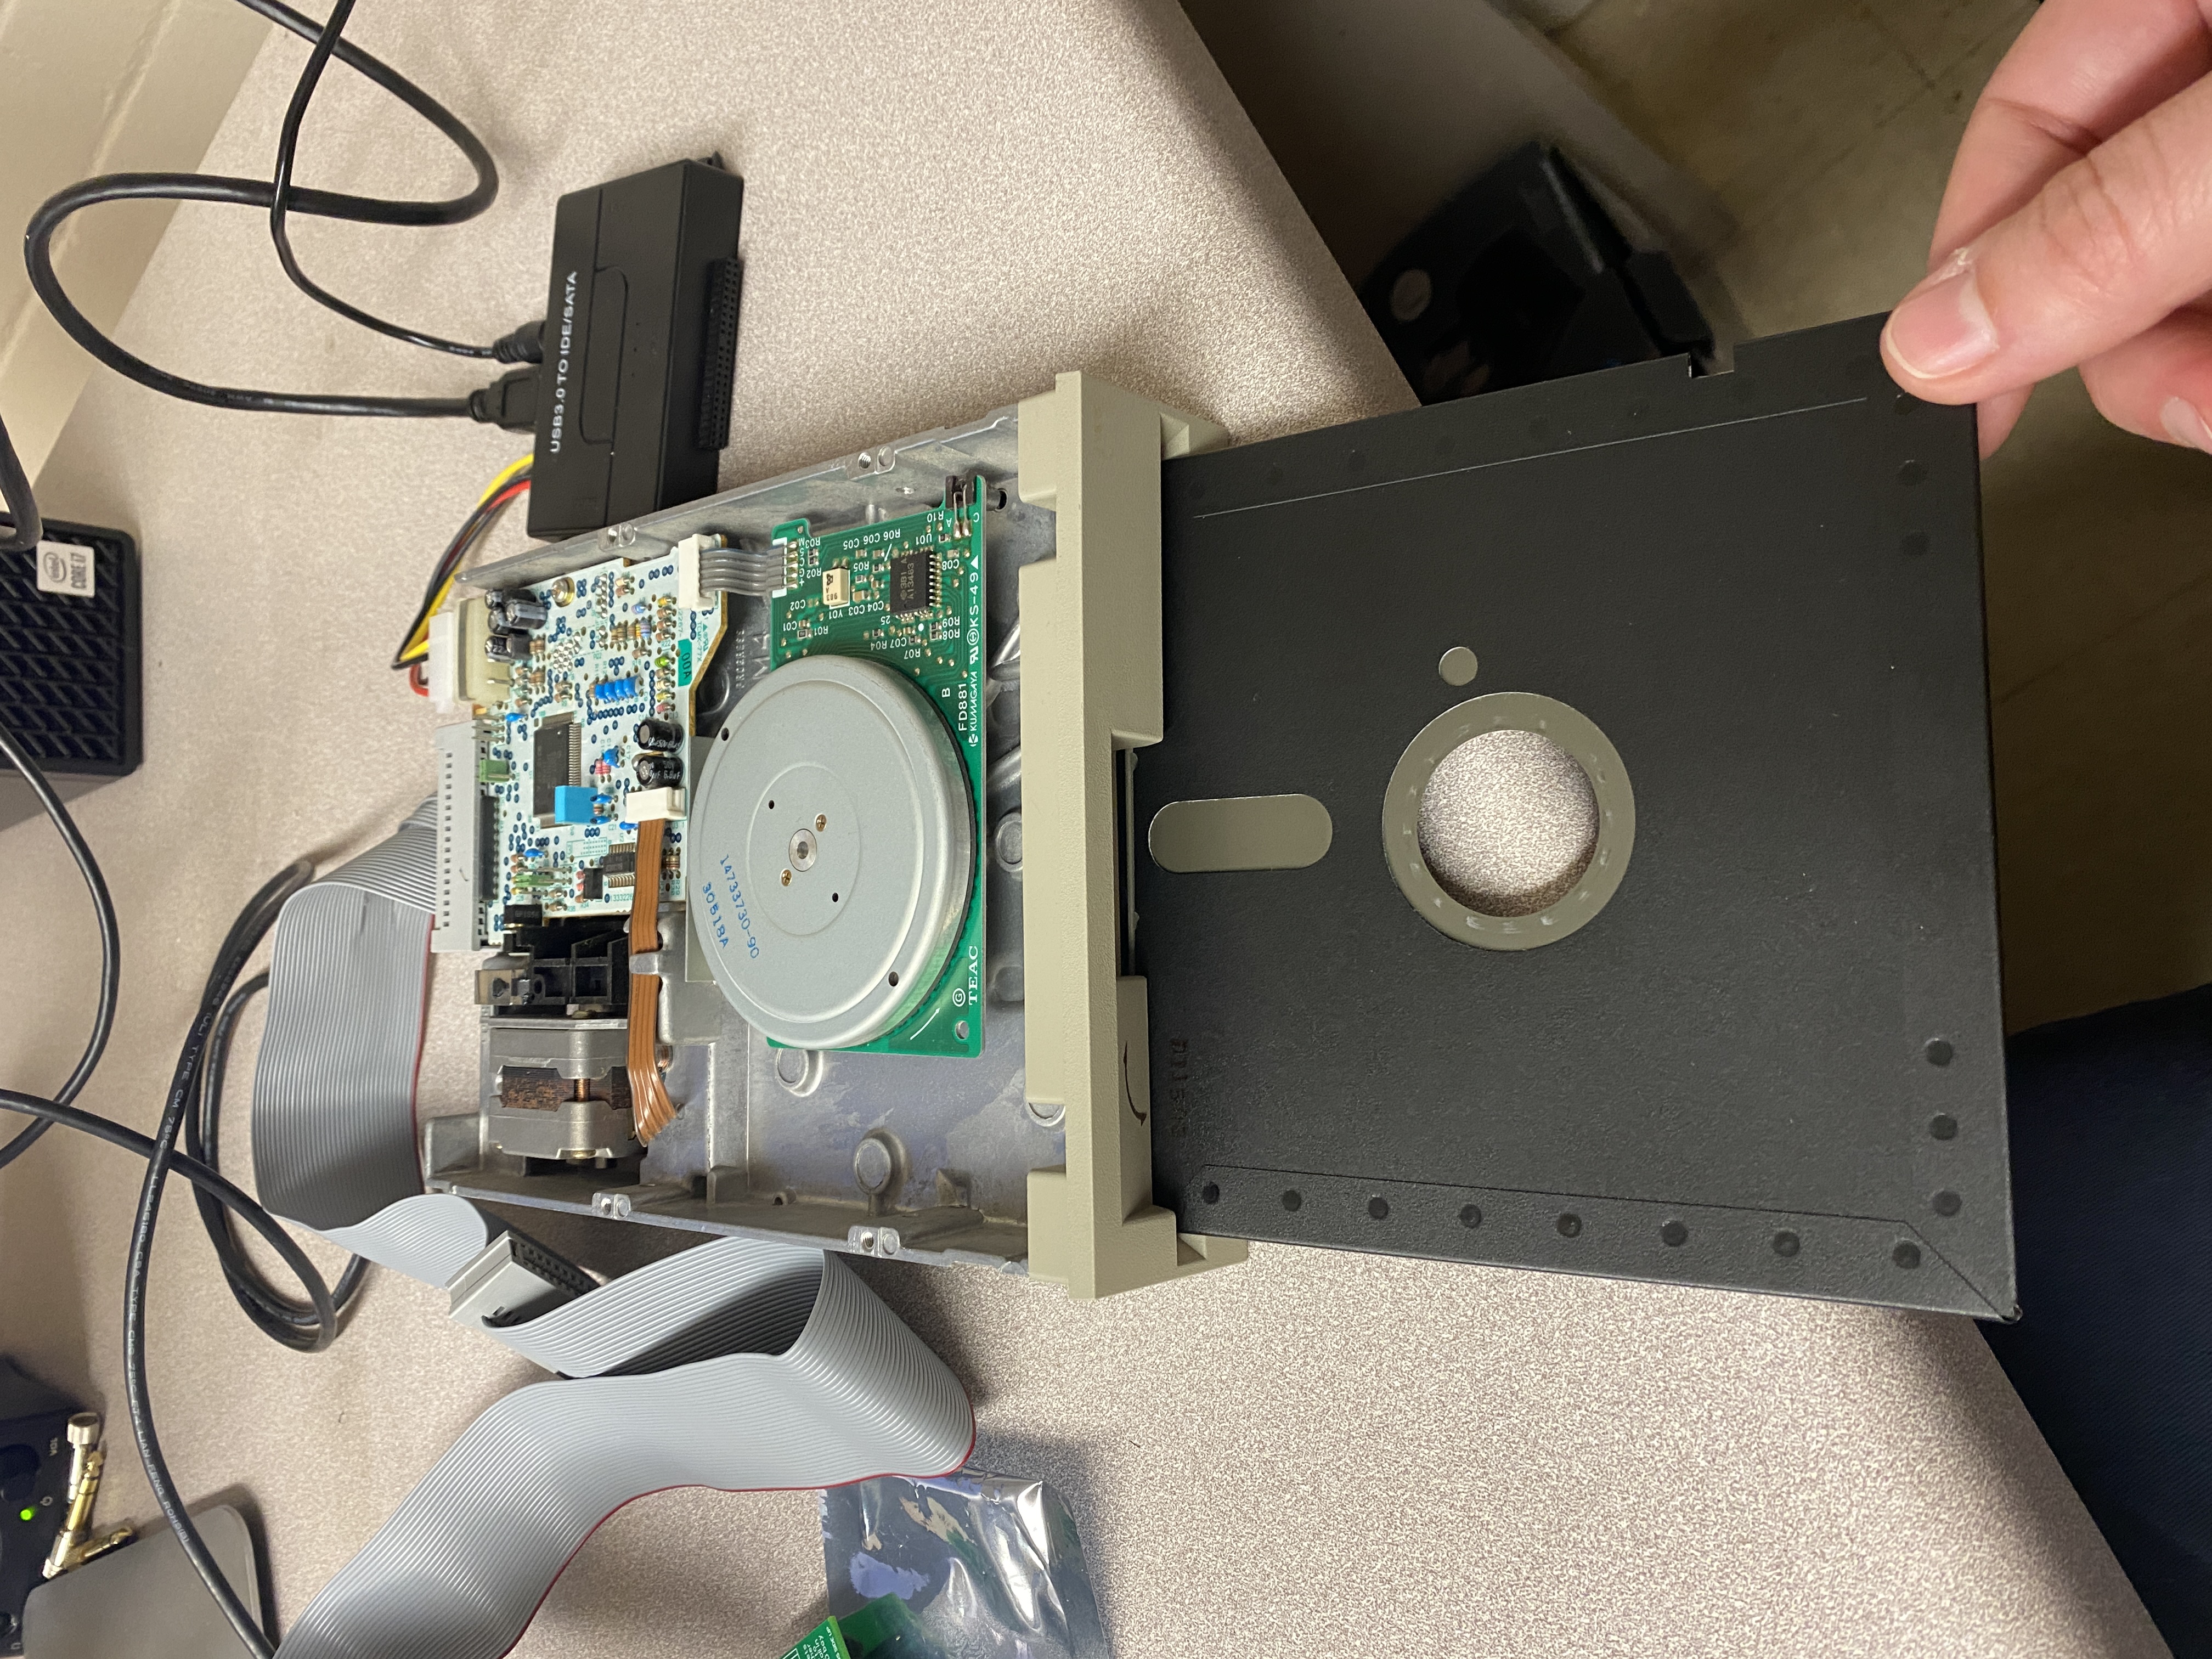
- Lock the drive by flipping the switch on the front of the drive “up”, as seen below:
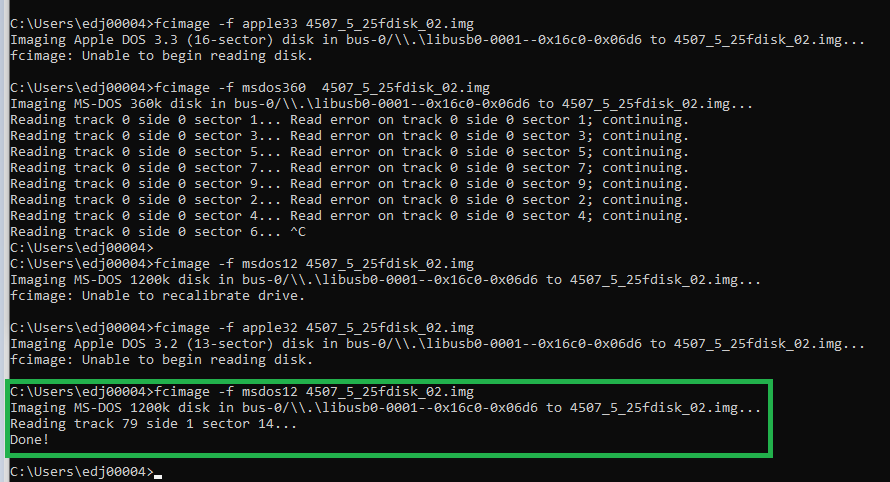
- The WVRHC uses the command line version of the FC5025 Floppy Controller software. Open the command line. With 5.25 inch disks, it is usually not possible to tell which file system or original operating system was used, meaning that trial and error is required to accurately image a disk. The FC5025 floppy controllers support many formats as a result. The following image commands and formats are supported: apple33 (Apple DOS 3.3 (16-sector)), apple32 (Apple DOS 3.2 (13-sector), applepro (Apple ProDos), c1541 (Commodore 1541), ti99 (TI-99/4A 90k), ti99ds180 (TI-99/4A 180k), ti99ds360 (TR-99/4A 360k), atari810 (Atari 810), msdos12 (MS-DOS 1200k), msdos360 (MS-DOS 360k), mdsad (North Star MDS-A-D 175k), mdsad350 (North Star MDS-A-D 350k), kaypro2 (Kaypro 2 CP/M 2.2), kaypro4(Kaypro 4 CP/M 2.2), vg4500 (CalComp Vistagraphics 4500), pmc (PMC MicroMate), coco (Tandy Color Computer Disc BASIC), versa (Motorola VersaDOS). The most commonly used commands will likely be MSDOS and Apple. Those should be tried first. The following is a sample of commands showing the trial and error process, showing unsuccessful commands and the final successful command boxed in green. Note that the successful command had to be tried twice due to drive calibaration issues:
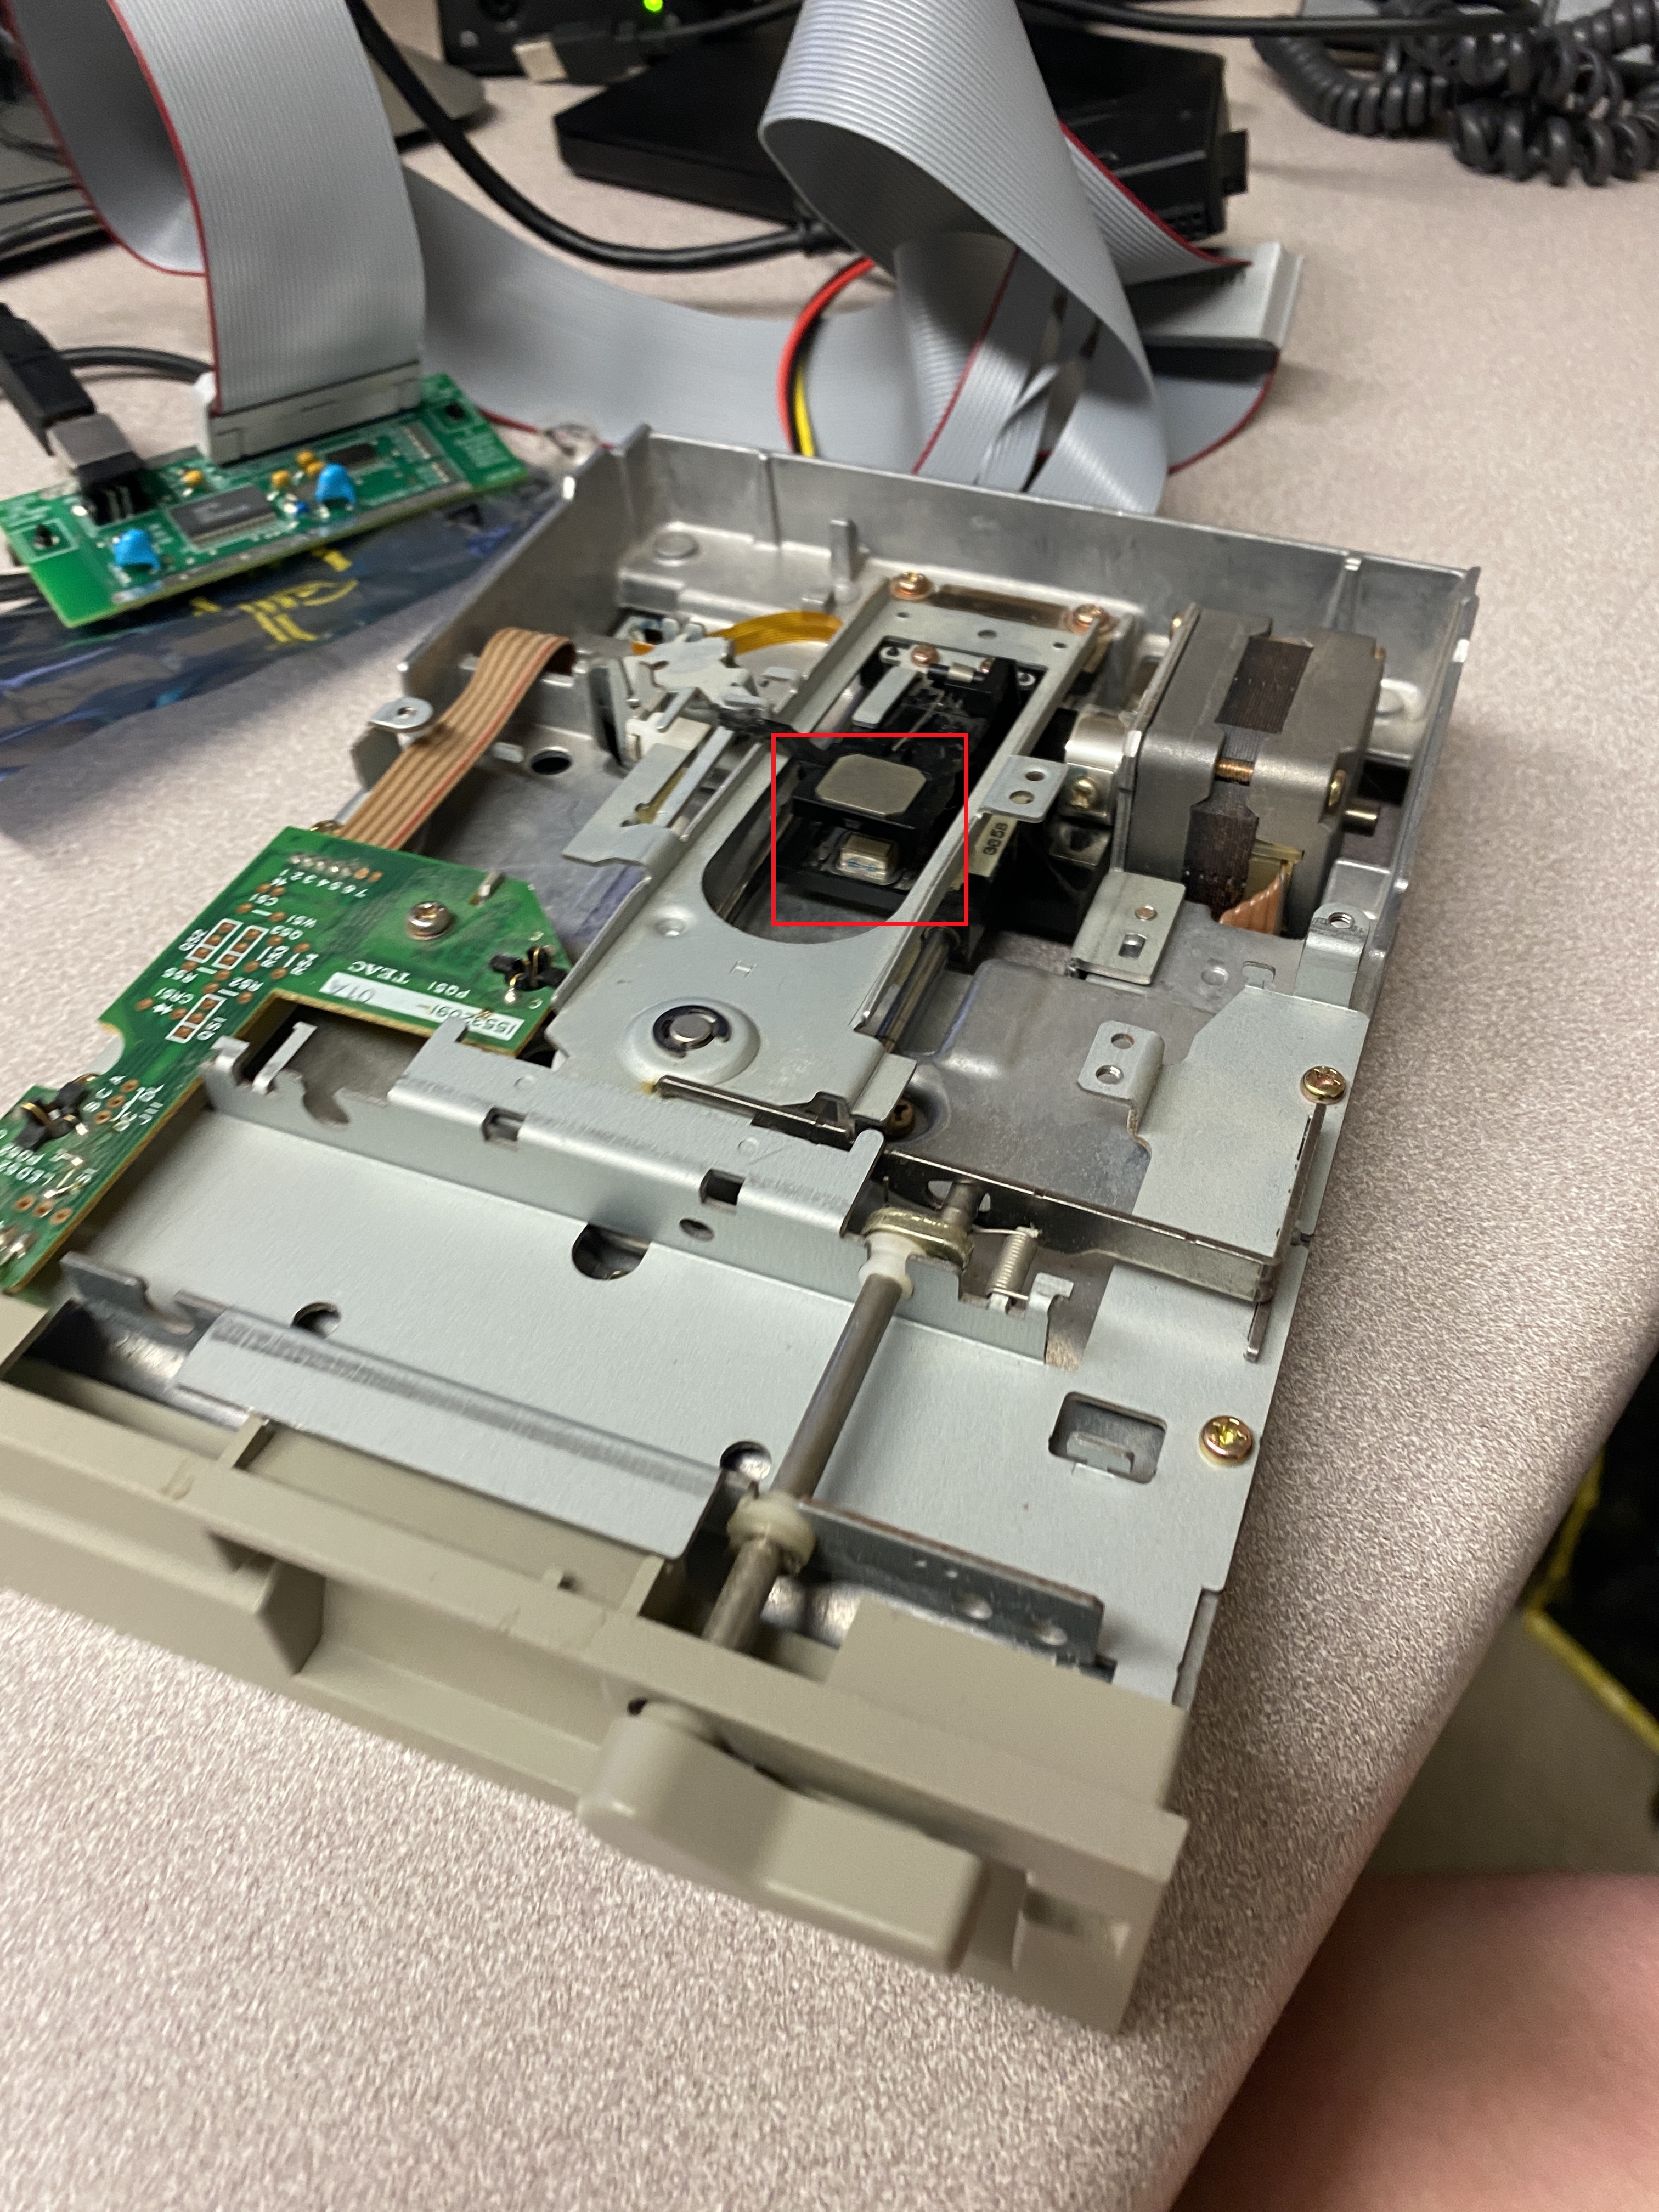
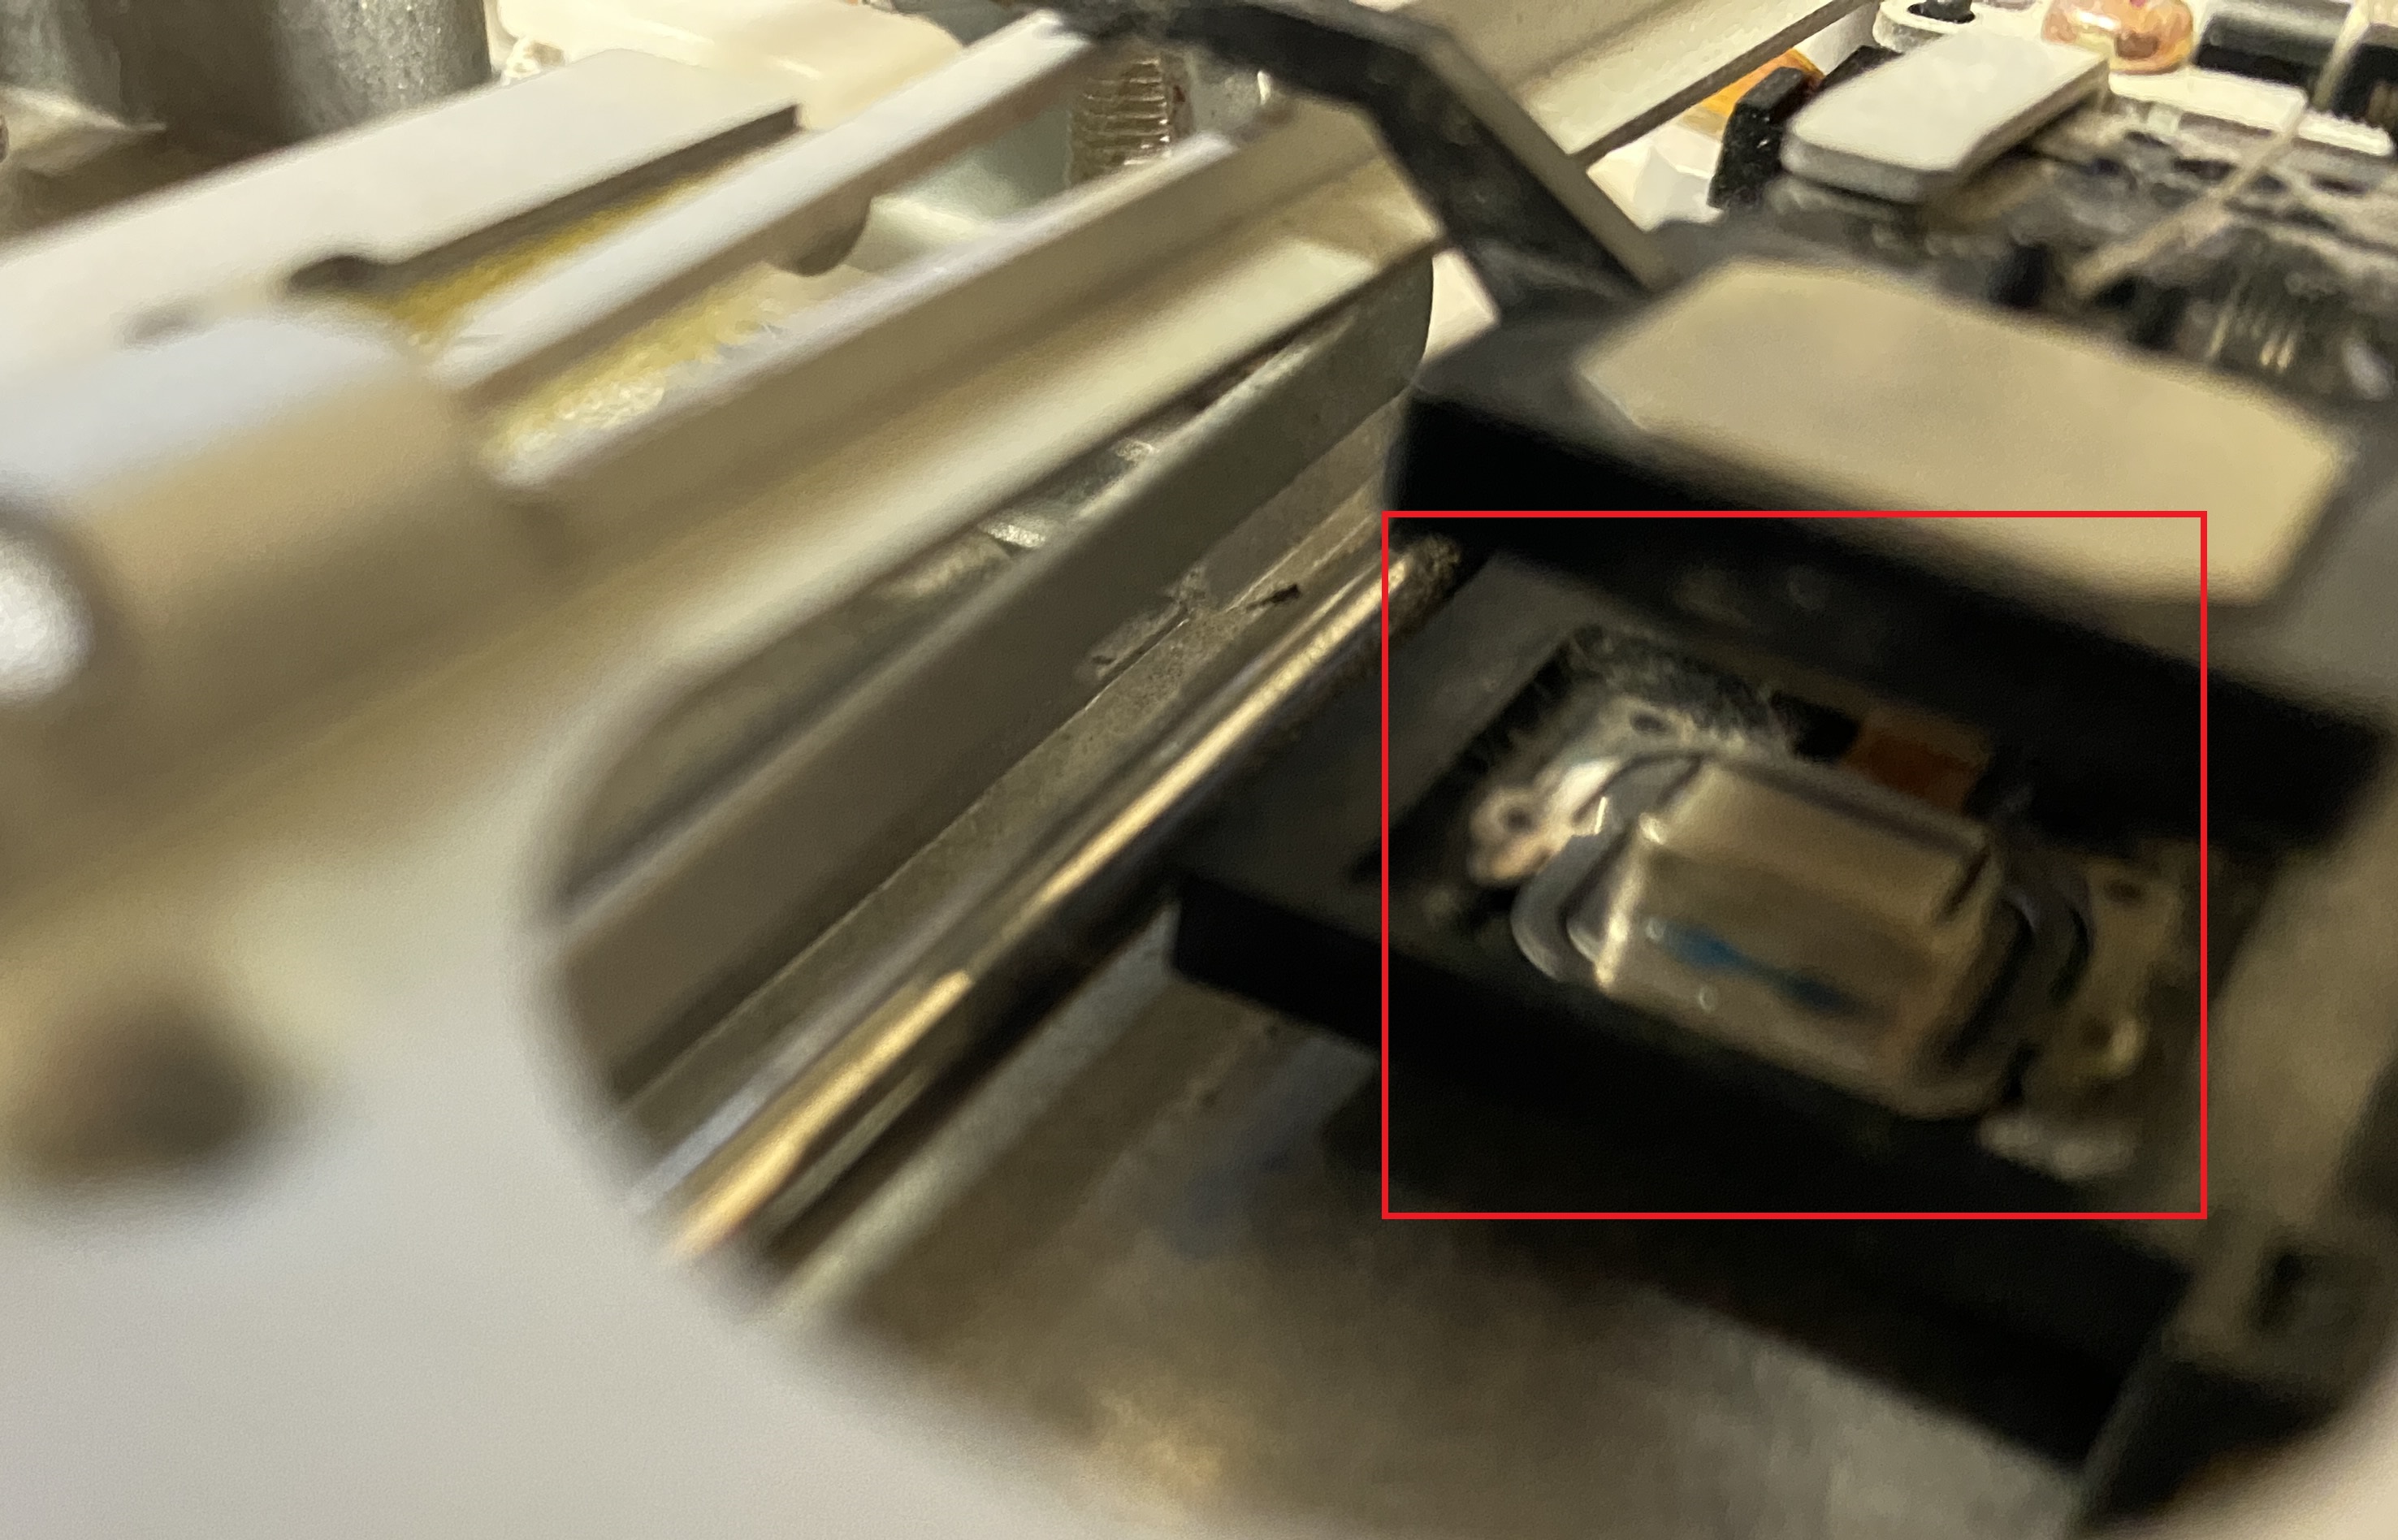
- Important note: If the drive squeals during imaging, please check and see if any black residue is on the drive head. If so, gently clean the head of the drive with a q-tip and isopropyl alcohol, ensuring no residue or fibers remain on the head. Allow to dry at least thirty minutes before imaging another disk. An image of the location of the drive head is boxed in the first photo and a photo of the clean drive head is in the second photo below.
- Once all content is in the identifier_content folder, run the following command on the command line, being sure that the input directory is the identifier_content folder and the output directory is the identifier_metadata folder.
brunnhilde.py -b -z --ssn_mode=2 [input directory, or content folder for item] [output directory, or File Metadata folder for item]- Example:
brunnhilde.py -b -z --ssn_mode=2 C:\Working Files\2828_disc_1_content C:\Working Files\2828_disc_1_metadata - Note: if an item is flagged as a virus by ClamAV (visible on the command line output), contact the Digital Archivist with the identifier for the item and immediately delete all content on the desktop and empty the Recycling Bin. Update the PREMIS spreadsheet in the Administrative folder within the folder for the collection or accession to include the event of Quarantine (if necessary) for the item. Do not continue to any additional steps.
- Move the identifier_content folder to the Content folder for the collection or accession and the identifier_metadata folder to the Metadata folder within the Administration folder within the accession or collection folder using the TeraCopy instructions. Remove _content and _metadata from the folder names.
- Update the PREMIS spreadsheet in the Administrative folder within the folder for the collection or accession to include the events for Brunnhilde report, Imaging, and/or Quarantine (if necessary) for the item.
If content was unretrievable:
If content acquisition for an item is unsuccessful, record a failure for the Imaging event in the PREMIS spreadsheet.
Zip Disks
| Software | Hardware |
|---|---|
| FTK Imager, Brunnhilde, Teracopy | iOmega Zip Disk Drive, SATA and IDE adapter |
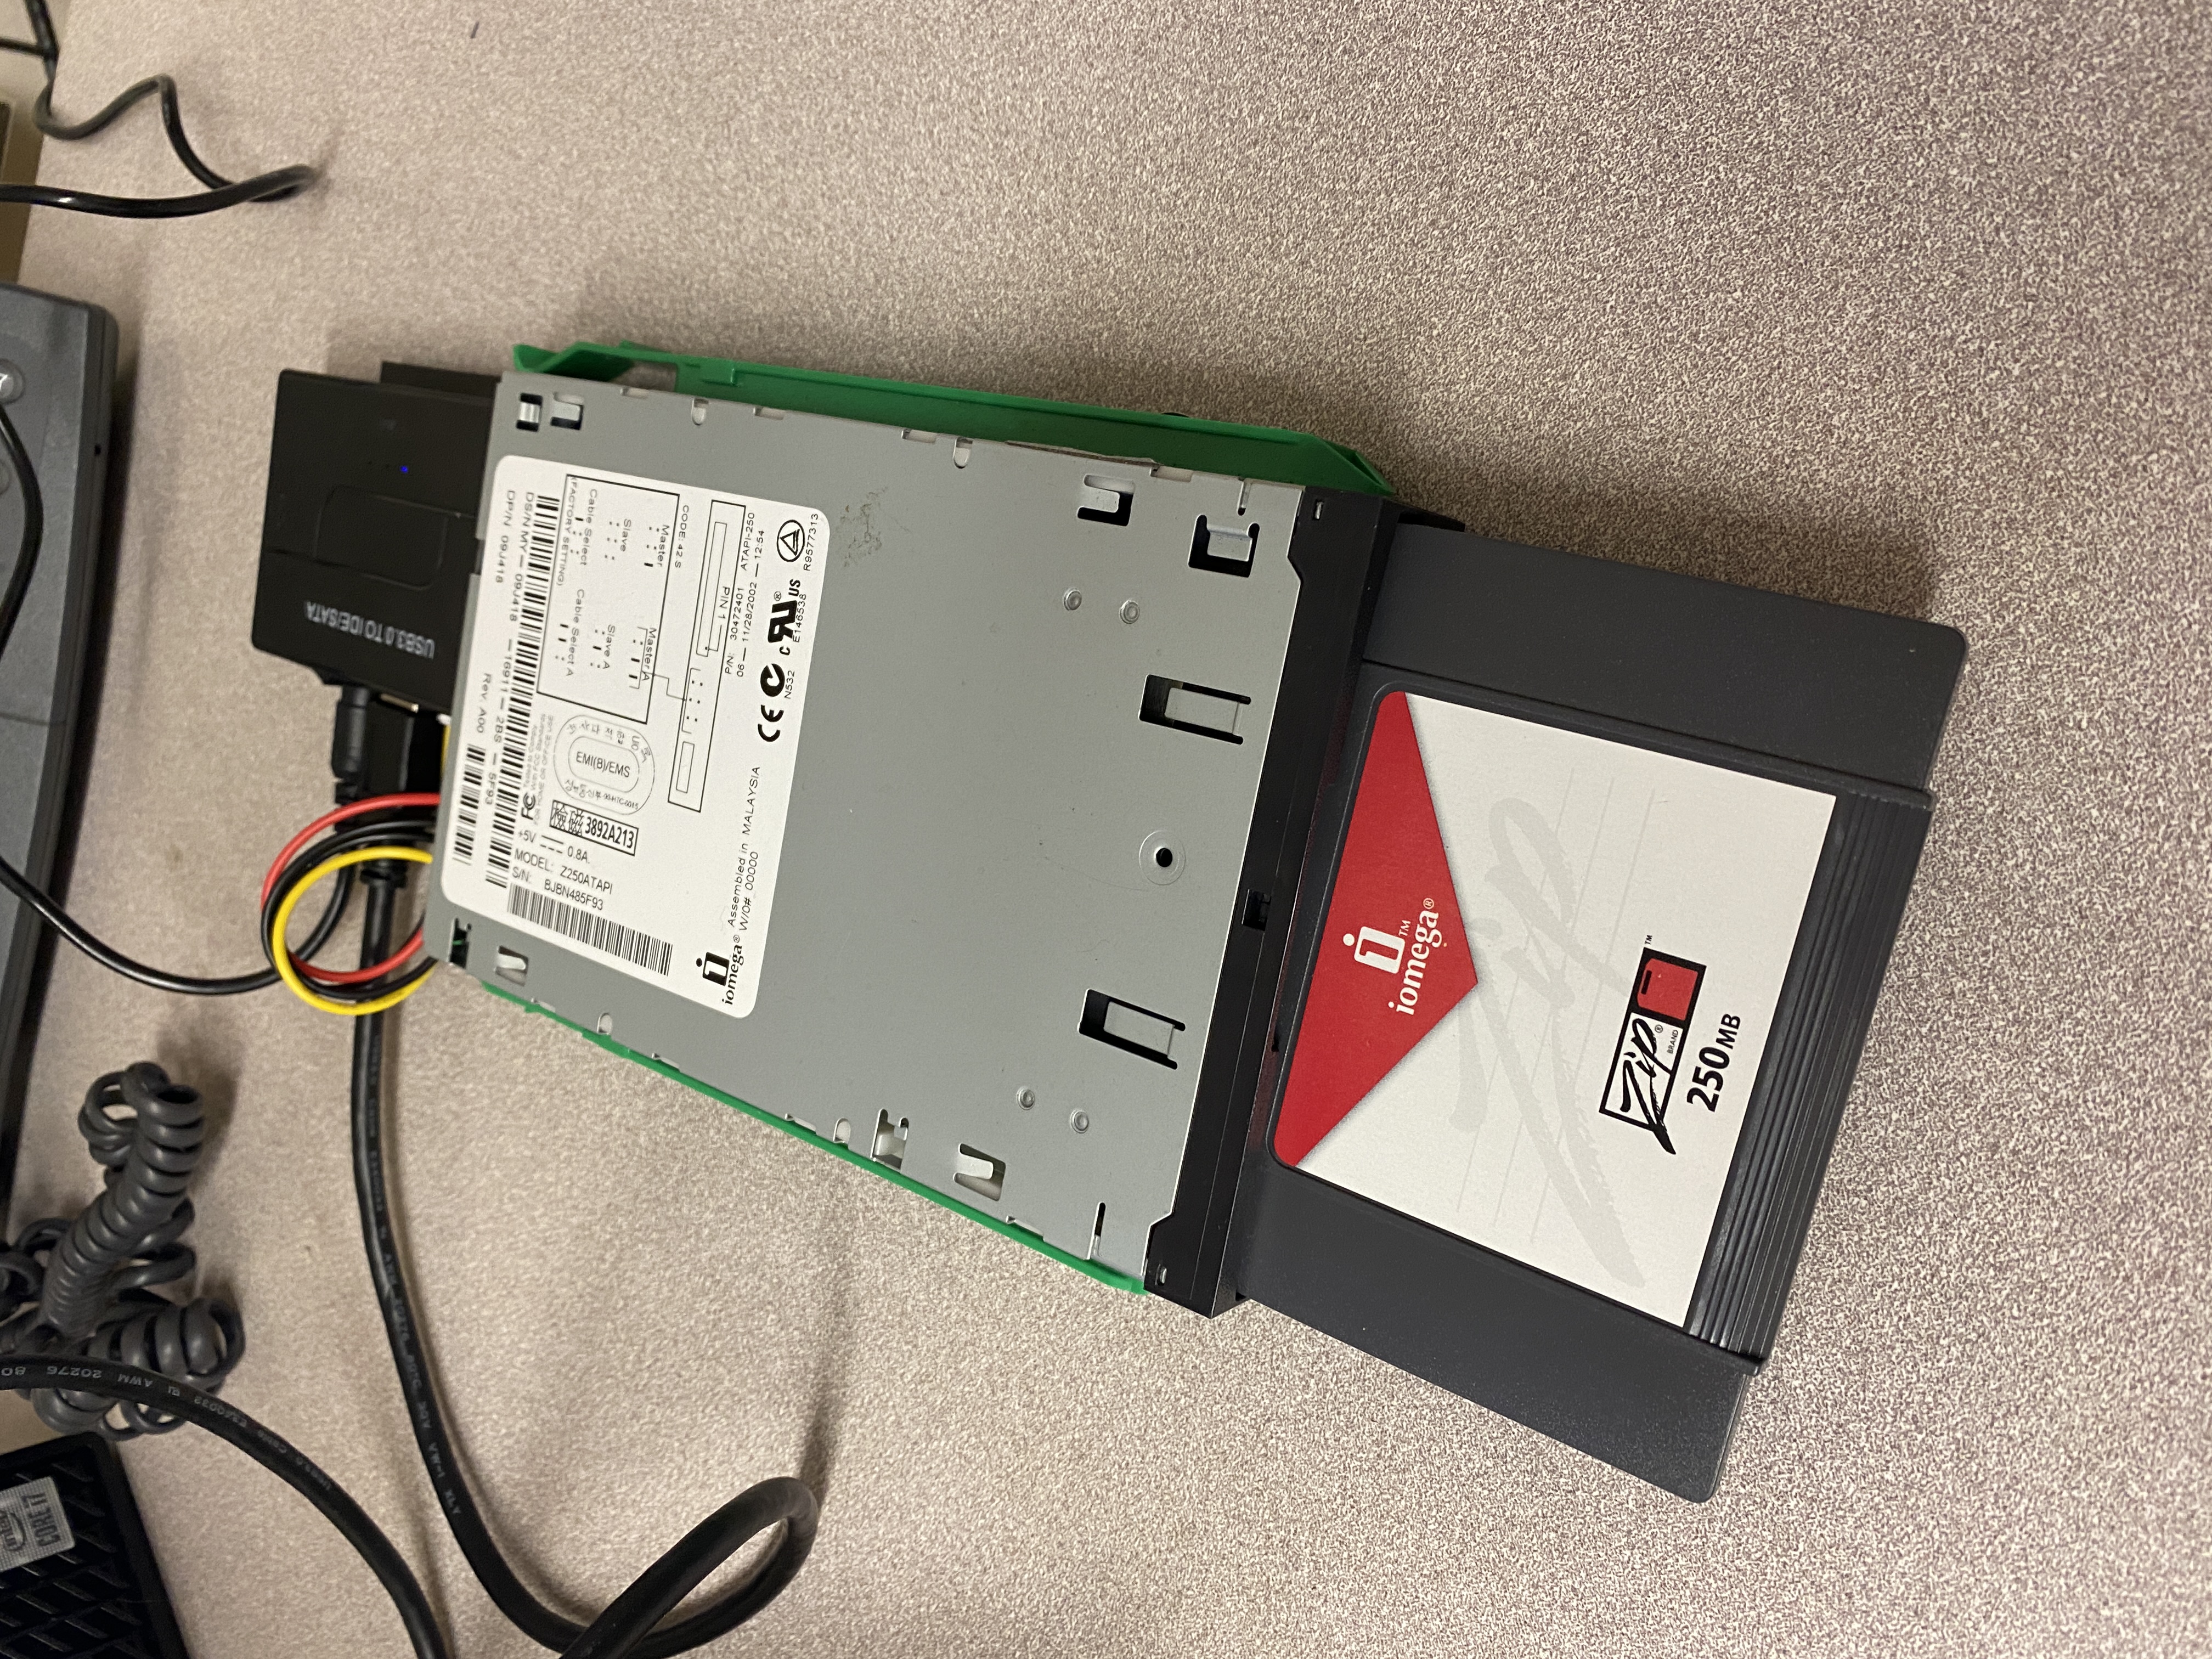
- Set up the Zip Disk Drive and SATA and IDE adapter as seen below.
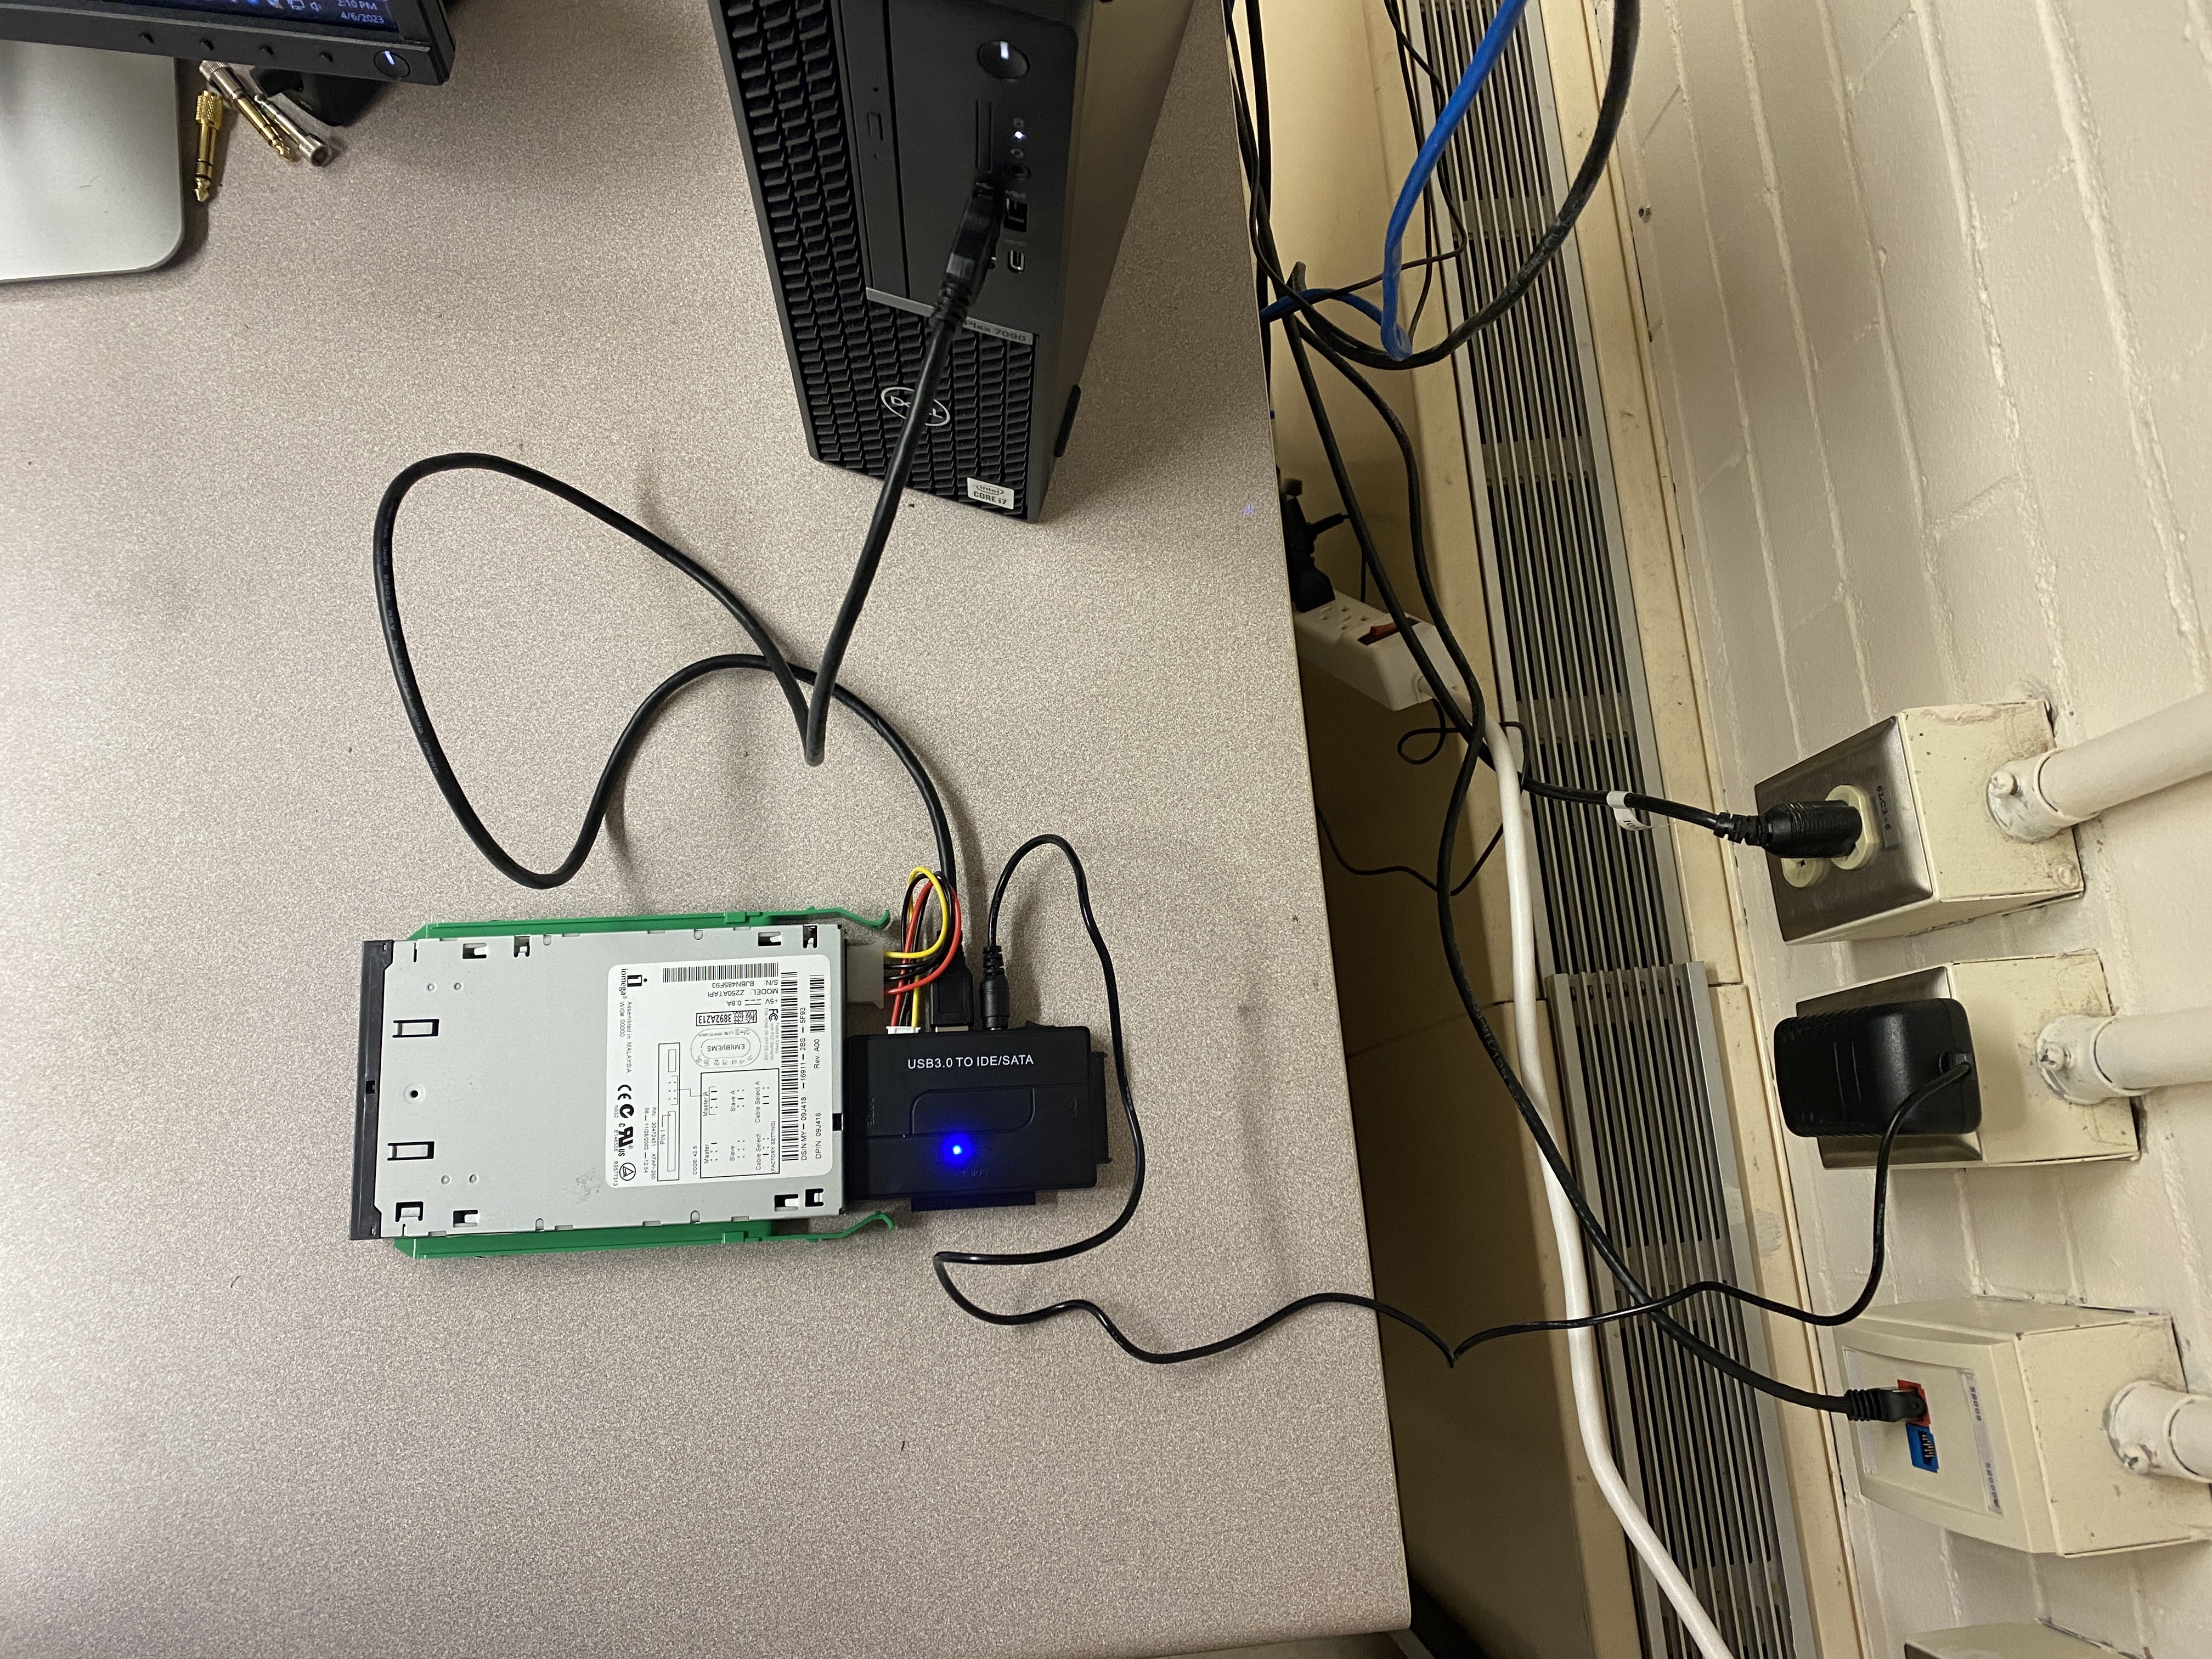
- Create two folders on the desktop using the media item’s identifier identified in the digital media inventory: identifier_content and identifier_metadata. The word “identifier” should be the identifier for the item, not the word identifier. Example: 2828_disc_1_content
- Insert the item into the drive, oriented as seen in the image below:
- Next, examine the contents of the item without opening any files. To access the content of the item via Windows Explorer, go to File Explorer->This PC->Devices and Drives and select the relevant drive by right clicking on the device or drive and selecting Open in New Window. Examine the item in IsoBuster by following Viewing a Disk Image or Media Item in IsoBuster instructions.
- If the drive:
- Has Mac file systems such as Hierarchical File System Plus (HFS+), Hierarchical File System (HFS), or Macintosh File System (MFS)
- Is formatted as multiple drives that show separately on IsoBuster
- Has content that is not identical in Windows Explorer and IsoBuster
Use the FTK Imager instructions to image the drive. For items formatted with multiple drives, be sure to capture each sub-drive with the FTK Imager instructions to image the item.
Otherwise, if the content is identical in all file systems in Windows Explorer vs. IsoBuster, follow the Teracopy instructions to copy all items from the drive to the identifier_content folder on the desktop. If the content does not match, follow the FTK Imager instructions for content extraction to accomplish the same task.
- Once all content is in the identifier_content folder, run the following command on the command line, being sure that the input directory is the identifier_content folder and the output directory is the identifier_metadata folder.
brunnhilde.py -b -z --ssn_mode=2 [input directory, or content folder for item] [output directory, or File Metadata folder for item]- Example:
brunnhilde.py -b -z --ssn_mode=2 C:\Working Files\2828_disc_1_content C:\Working Files\2828_disc_1_metadata - Note: if an item is flagged as a virus by ClamAV (visible on the command line output), contact the Digital Archivist with the identifier for the item and immediately delete all content on the desktop and empty the Recycling Bin. Update the PREMIS spreadsheet in the Administrative folder within the folder for the collection or accession to include the event of Quarantine (if necessary) for the item. Do not continue to any additional steps.
- Move the identifier_content folder to the Content folder for the collection or accession and the identifier_metadata folder to the Metadata folder within the Administration folder within the accession or collection folder using the TeraCopy instructions. Remove _content and _metadata from the folder names.
- Update the PREMIS spreadsheet in the Administrative folder within the folder for the collection or accession to include the events for Brunnhilde report, Imaging (if necessary), Replication (if necessary), and/or Quarantine (if necessary) for the item.
If content was unretrievable:
If content acquisition for an item is unsuccessful, record a failure for the Imaging event in the PREMIS spreadsheet.
Thumb Drives, Internal Hard Drives, External Hard Drives, and Memory Cards
Though each of the physical formats described here use the same software for content acquisition, the hardware needed to access that content differs significantly.
If content acquisition for an item is unsuccessful or duplicate media items within a single collection are present, forward the identifiers for these materials to the Digital Archivist.
Note: Some thumb and hard drives may be too large to simply save to the desktop as in other procedures. In that case, contact the Digital Archivist and they will arrange an external hard drive for use in accessioning and processing.
- To determine the size of the item’s drive and the computer:
- Follow the Tableau instructions to plug in the drive for the item.
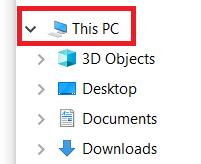
- Go to File Explorer -> This PC -> Devices and Drives
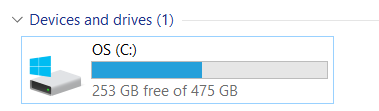
- Compare the drive space of your computer to the external drive. Your computer will usually be the C: or H: drive. The external drive will usually be labelled with a brand name that is identifiable. In the above example 253GB is available on the computer.
- If your computer has less space than the external drive, contact the Digital Archivist and move on to the next item.
Thumb Drives and External Hard Drives
| Software | Hardware |
|---|---|
| FTK Imager, IsoBuster, Brunnhilde, TeraCopy | Tableau Forensic USB 3.0 Bridge |
- Follow the Tableau instructions to plug in the drive for the item.
- Check that there is sufficient space to process the content using the instructions in the beginning of the Thumb drives, internal hard drives, external hard drives, and memory cards section.
- Create two folders on the desktop using the media item’s identifier identified in the digital media inventory: identifier_content and identifier_metadata. The word “identifier” should be the identifier for the item, not the word identifier. Example: 2828_disc_1_content
- Next, examine the contents of the item without opening any files. To access the content of the item via Windows Explorer, go to File Explorer->This PC->Devices and Drives and select the relevant drive by right clicking on the device or drive and selecting Open in New Window. Examine the item in IsoBuster by following Viewing a Disk Image or Media Item in IsoBuster instructions.
- If the drive:
- Has Mac file systems such as Hierarchical File System Plus (HFS+), Hierarchical File System (HFS), or Macintosh File System (MFS)
- Is formatted as multiple drives that show separately on IsoBuster
- Has content that is not identical in Windows Explorer and IsoBuster
Use the FTK Imager instructions to image the drive. For items formatted with multiple drives, be sure to capture each sub-drive with the FTK Imager instructions to image the item.
Otherwise, if the content is identical in all file systems in Windows Explorer vs. IsoBuster, follow the Teracopy instructions to copy all items from the drive to the identifier_content folder on the desktop. If the content does not match, follow the FTK Imager instructions for content extraction to accomplish the same task.
- Once all content is in the identifier_content folder, run the following command on the command line, being sure that the input directory is the identifier_content folder and the output directory is the identifier_metadata folder.
brunnhilde.py -b -z --ssn_mode=2 [input directory, or content folder for item] [output directory, or File Metadata folder for item]- Example:
brunnhilde.py -b -z --ssn_mode=2 C:\Working Files\2828_disc_1_content C:\Working Files\2828_disc_1_metadata - Note: if an item is flagged as a virus by ClamAV (visible on the command line output), contact the Digital Archivist with the identifier for the item and immediately delete all content on the desktop and empty the Recycling Bin. Update the PREMIS spreadsheet in the Administrative folder within the folder for the collection or accession to include the event of Quarantine (if necessary) for the item. Do not continue to any additional steps.
- Move the identifier_content folder to the Content folder for the collection or accession and the identifier_metadata folder to the Metadata folder within the Administration folder within the accession or collection folder using the TeraCopy instructions. Remove _content and _metadata from the folder names.
- Update the PREMIS spreadsheet in the Administrative folder within the folder for the collection or accession to include the events for Brunnhilde report, Imaging (if necessary), Replication (if necessary), and/or Quarantine (if necessary) for the item.
Internal Hard Drives
Currently, SATA (2.5 and 3.5 inch) and IDE (2.5 and 3.5 inch) connections are supported for internal hard drives.
| Software | Hardware |
|---|---|
| FTK Imager, IsoBuster, Brunnhilde, TeraCopy | Tableau Forensic USB 3.0 Bridge, SATA and IDE adapter |
- Follow the Tableau instructions to plug in the drive for the item.
- Check that there is sufficient space to process the content using the instructions in the beginning of the Thumb drives, internal hard drives, external hard drives, and memory cards section.
Connect the hard drive to the computer as follows: the below configuration shows how to use the adapter kit to connect the hard drive to the adapter. The setup below will then be connected to the Tableau Forensic USB 3.0 Bridge. Use the Tableau instructions to correctly connect the hard drive adapter to the Tableau and the computer.
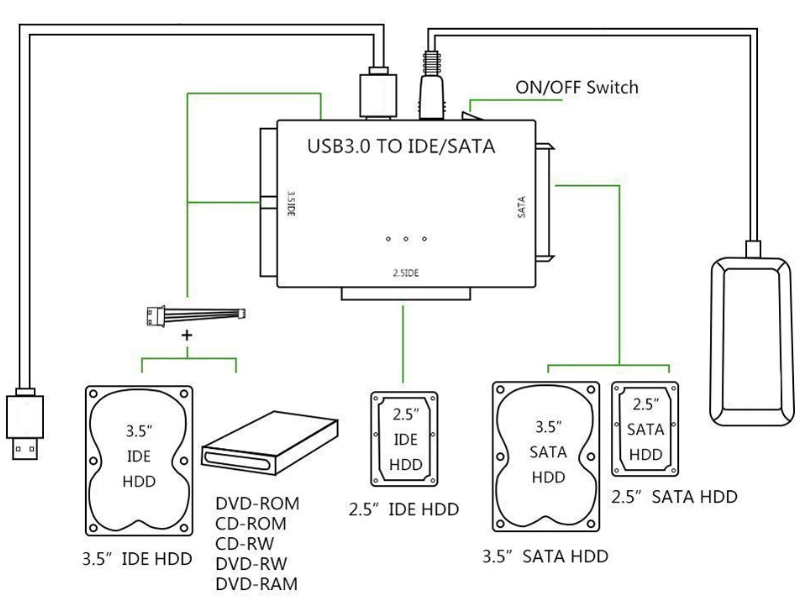
Illustration taken from documentation for the adapter demonstrating the connection configurations for IDE and SATA drives.
- Create two folders on the desktop using the media item’s identifier identified in the digital media inventory: identifier_content and identifier_metadata. The word “identifier” should be the identifier for the item, not the word identifier. Example: 2828_disc_1_content
- Use the FTK Imager instructions to image the drive.
- Note: Some items, particularly hard drives, may be formatted as multiple drives that show separately. For these items, be sure to capture each sub-drive with FTK Imager instructions to image the drive.
- Once all content is in the identifier_content folder, run the following command on the command line, being sure that the input directory is the identifier_content folder and the output directory is the identifier_metadata folder.
brunnhilde.py -b -z --ssn_mode=2 [input directory, or content folder for item] [output directory, or File Metadata folder for item]- Example:
brunnhilde.py -b -z --ssn_mode=2 C:\Working Files\2828_disc_1_content C:\Working Files\2828_disc_1_metadata - Note: if an item is flagged as a virus by ClamAV (visible on the command line output), contact the Digital Archivist with the identifier for the item and immediately delete all content on the desktop and empty the Recycling Bin. Update the PREMIS spreadsheet in the Administrative folder within the folder for the collection or accession to include the event of Quarantine (if necessary) for the item. Do not continue to any additional steps.
- Move the identifier_content folder to the Content folder for the collection or accession and the identifier_metadata folder to the Metadata folder within the Administration folder within the accession or collection folder using the TeraCopy instructions. Remove _content and _metadata from the folder names.
- Update the PREMIS spreadsheet in the Administrative folder within the folder for the collection or accession to include the events for Brunnhilde report, Imaging (if necessary), Replication (if necessary), and/or Quarantine (if necessary) for the item.
Memory Cards
There are many types of memory cards and each requires a different type of card reader. At the WVRHC we have two card readers that support multiple types of memory cards.
If content acquisition for an item is unsuccessful or duplicate media items within a single collection are present, forward the identifiers for these materials to the Digital Archivist.
| Software | Hardware |
|---|---|
| FTK Imager, IsoBuster, Brunnhilde, TeraCopy | Tableau Forensic USB 3.0 Bridge, all-in-one memory card readers |
- Follow the Tableau instructions to plug in the drive for the item.
- Check that there is sufficient space to process the content using the instructions in the beginning of the Thumb drives, internal hard drives, external hard drives, and memory cards section.
- Create two folders on the desktop using the media item’s identifier identified in the digital media inventory: identifier_content and identifier_metadata. The word “identifier” should be the identifier for the item, not the word identifier. Example: 2828_disc_1_content
Next, examine the contents of the item without opening any files. To access the content of the item via Windows Explorer, go to File Explorer->This PC->Devices and Drives and select the relevant drive by right clicking on the device or drive and selecting Open in New Window. Examine the item in IsoBuster by following Viewing a Disk Image or Media Item in IsoBuster instructions.
- If the card:
- Has Mac file systems such as Hierarchical File System Plus (HFS+), Hierarchical File System (HFS), or Macintosh File System (MFS)
- Contains content only visible in IsoBuster and not in Windows Explorer
- Is formatted as multiple drives that show separately on IsoBuster
Use the FTK Imager instructions to image the disc. For items formatted with multiple drives, be sure to capture each sub-drive with the FTK Imager instructions to image the item.
Otherwise, if the content is identical in all file systems in Windows Explorer vs. IsoBuster, follow the Teracopy instructions to copy all items from the disc to the identifier_content folder on the desktop. If the content does not match, follow the FTK Imager instructions for content extraction to accomplish the same task.
- Once all content is in the identifier_content folder, run the following command on the command line, being sure that the input directory is the identifier_content folder and the output directory is the identifier_metadata folder.
brunnhilde.py -b -z --ssn_mode=2 [input directory, or content folder for item] [output directory, or File Metadata folder for item]- Example:
brunnhilde.py -b -z --ssn_mode=2 C:\Working Files\2828_disc_1_content C:\Working Files\2828_disc_1_metadata - Note: if an item is flagged as a virus by ClamAV (visible on the command line output), contact the Digital Archivist with the identifier for the item and immediately delete all content on the desktop and empty the Recycling Bin. Update the PREMIS spreadsheet in the Administrative folder within the folder for the collection or accession to include the event of Quarantine (if necessary) for the item. Do not continue to any additional steps.
- Move the identifier_content folder to the Content folder for the collection or accession and the identifier_metadata folder to the Metadata folder within the Administration folder within the accession or collection folder using the Teracopy instructions. Remove _content and _metadata from the folder names.
- Update the PREMIS spreadsheet in the Administrative folder within the folder for the collection or accession to include the events for Brunnhilde report, Imaging (if necessary), Replication (if necessary), and/or Quarantine (if necessary) for the item.
Hardware Workflows
Tableau Forensic Bridge
- With the Tableau Forensic Bridge turned off, plug in the external device or adapter for the external device you wish to write protect into the USB port.
- Connect the Tableau to the workstation with the blue USB 3.0 cable.
- Connect the two black power cables together and then attach the power cable to the Tableau and then plug the cable into an outlet.
Power on the Tableau using the power button, which features the following symbol.

- The lights on the right side of the forensic bridge will indicate the power, connection to the device and workstation, and indicate that write-blocking is activated.
- The external device will appear in Windows File Manager.
- When data on the device is read, the ‘Activity’ light will glow red.
Software Workflows
FTK Imager
Imaging an Item
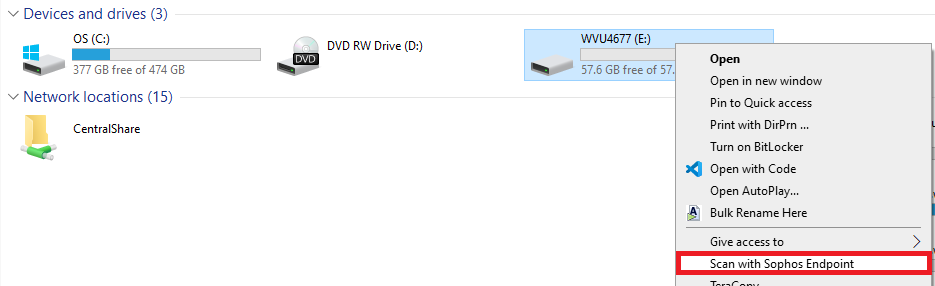
Conduct a virus scan on the item. To do this via Windows Explorer, go to File Explorer->This PC->Devices and Drives, right click on the drive, and select Scan with Sophos Endpoint. You should receive a notification that no viruses were found—if so, continue. If there were viruses found, note the name(s) and the item identifier and return the item to the Digital Archivist.
- Open FTK Imager. The FTK Imager icon is located on the desktop and named AccessData FTK Imager.
- Click File then select Create Disk Image.. from the dropdown.
Select the Source Evidence Type. For typical purposes, select Logical Drive.
Note: The choice of source evidence type depends on context of acquisition, including whether environment and file structure matter.
Source Evidence Type Summary Physical Drive Captures every sector of the physical media including hidden and deleted files. Requires the most imaging time and storage space. Logical Drive Acquires image of a single logical volume (e.g. C:\). Does not capture hidden and deleted files. This is the only available option for optical media. Contents of a Folder Acquires a logical image of a specific folder’s contents. - Select the Source Drive from the dropdown menu. The actual text will vary based on the item being imaged. For instance, a thumb drive may appear as: \.\PHYSICALDRIVE1 - MUSHKIN MKNUFDVS64GB USB Device, indicating that the item is a 64GB USB drive, or a floppy disk might simply appear as A:\ Click Finish.
- In the Image Destination(s) window, click Add… Select Raw (dd) as the Destination Image Type. Click Next.
- In the Evidence Item Information window, populate the fields as follows:
- Case Number – accession or archives and manuscript number
- Evidence Number – identifier for the item
- Unique Description – If desired, enter a brief description of the media and/or its annotations (e.g., ‘3.5” floppy disk labelled “FOA Photos 2002”’)
- Examiner – name of person creating the image
- Notes – leave blank
- FTK Imager will now ask you for information about where to save the resulting disk image and metadata files. Enter the following and then select Finish:
- Image destination folder: Select the identifier_content folder on the desktop.
- Image filename: Enter the item’s identifier.
- Double-check to make sure that the Image Destination and settings appear correct. Click Start to begin the disk imaging process.
- These options will be checked by default when acquiring a logical image. You don’t need to change anything:
- Verify images after they are created
- Precalculate Progress Statistics
- Create directory listings of all files in the image after they are created
- These options will be checked by default when acquiring a logical image. You don’t need to change anything:
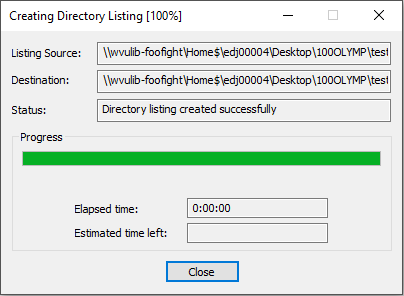
A dialogue box with progress bar and elapsed time will pop up and remain up once the image is successfully created (see pop up below) or the imager fails. If the imager fails or seems to get hung up on a large number of bad sectors (aka the image progress bar fails to continue): Document the failure in the PREMIS Spreadsheet for the collection that the Imaging event failed for FTK Imager. Forward the identifier to the Digital Archivist with information about the failure.
Close the remaining windows and go to the identifier_content folder on the desktop where you saved the items. You will see three or four files depending on the input format:


- .iso or .001 - the disk image file for the item. This is a disk image for a disc rather than a hard drive, so it appears as an .iso. Other items may appear as .001
- .cue.csv - list of files present in the disk image.
- .cue.txt - text file representing the structure of the disk
- .cue - used only for CD or DVD items, additional information about the structure of the compact disc
- Move the files ending in .cue, .cue.csv, and .cue.txt to the identifier_metadata folder on the desktop.
Viewing a Disk Image or Media Item
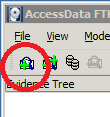
Click File, then Add Evidence Item. Or click on the “Add Evidence Item” icon
- From the dialogue box that appears, select one of the sequences below.
- Physical Drive – View the entire drive, which can include multiple logical drives. This is only really necessary to verify internal and external hard drives do not have multiple logical drives that should be imaged or examined separately.
- Logical Drive – For most media and for all optical media choose Logical Drive.
- Image File – To view a disk image.
- Contents of a Folder – Self explanatory.
- Follow the prompts for the relevant selection. This may include selecting the physical or logical drive you’d like to view or selecting the disk image file.
- In the upper left Evidence Tree pane you can explore the file system(s) of the mounted evidence item by clicking on plus symbols to expand folders.
- Clicking on a folder will display its contents in the File List pane (top right) and Hex Viewer pane (bottom right).
- Clicking on a file in the File List pane (top right) will display its text contents in the Hex Viewer pane (bottom right).
Extracting Content from a Disk Image or Media Item
- To extract content from a disk image, first follow the directions to View a Disk Image or Media Item.
For disk image files, navigate to the top level folder or file you would like to extract. This might be the [root] folder. Right click on the folder or file and select Export Files… Optionally, you can extract a directory listing with checksums for each file using Export File Hash List…
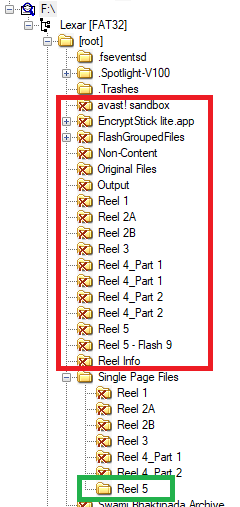
For logical drives, navigate to the top level folder or file you would like to extract. Right click on the folder or file and select Export Files… Export files to the identifier_content folder. NOTE: Be sure to ignore any system folders (like .fseventsd or .Trashes) and any folders with a red x over them (seen boxed in red below). These folders contain deleted materials and should not be removed from the original media unless explicit donor permission to recover media has been granted. Only grab folders that are simply a folder icon with content that does not have a red x (seen boxed in green below). If there is a significant amount of deleted content that makes it hard to navigate, consider making a logical disk image and then extracting content from the image file.
IsoBuster
Identifying the Format of a Disc
- Insert the disk into the CD/DVD drive and open IsoBuster.
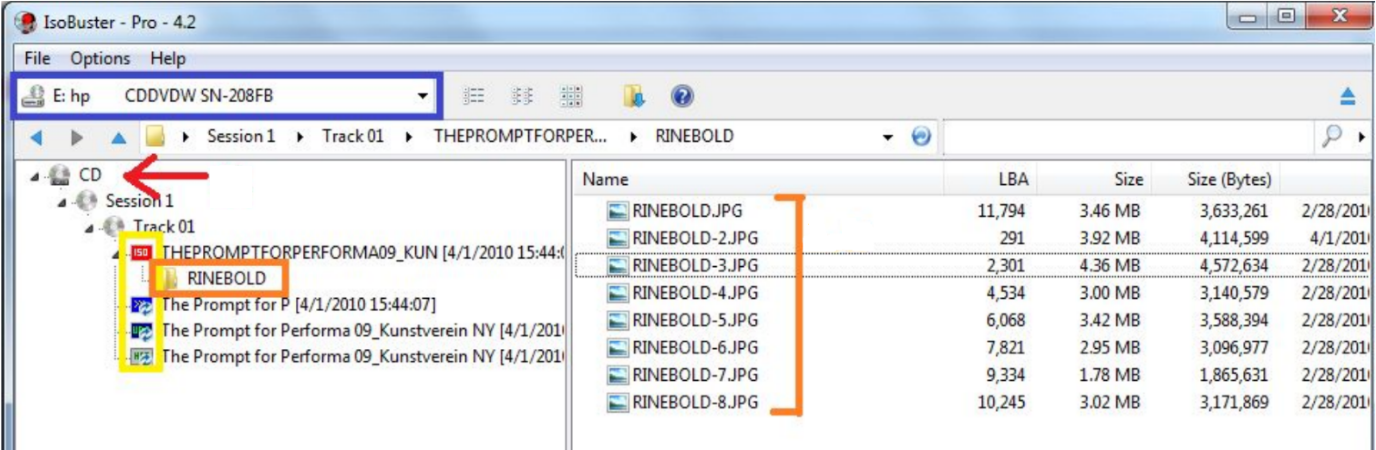
- In the drop-down menu on top (outlined by the blue box in the image below, image from Annie Schweikert), select the disc drive you are using. This is D: if you are using an internal disc drive but will vary if using an external disc drive. Once the disc drive is selected, the disc’s directory structure will appear in the left-hand menu.
- The red arrow indicates the type of disc. You can navigate through the disc structure by clicking on the directories in the left menu. The contents of the active directory (the one you most recently clicked on, marked in orange on the right) will appear on the right. In the below view, the directory “RINEBOLD” (in orange box on left) is active, and the right side displays the contents of that directory. The yellow box contains the file systems present on the disc.

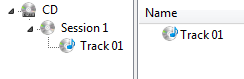
If the type of disc indicates CD or CD-DA, only contains audio files (see example audio icon next to “Track 01” below), only contains one session (see example below) and contains no filesystems, follow the instructions for CD-DA. Otherwise, follow the instructions for All Other CD and DVD Formats.
Imaging an Item
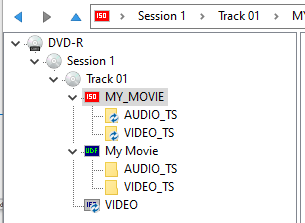
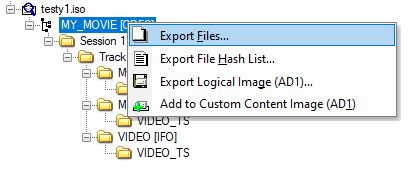
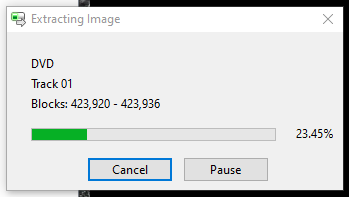
Open IsoBuster. Click on the top level DVD directory (boxed in red below) and make sure it is highlighted in blue. Be sure you select the DVD directory—selecting a session or track will only image those portions of the DVD.

Right click on the DVD directory. Select __Extract DVD
__ and click __User Data (*.iso)__ (both boxed in red below). 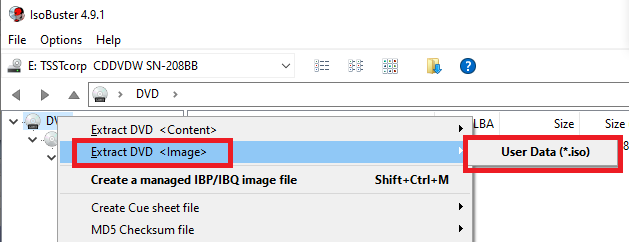
In the Save dialog box that pops up, direct the file to save to the identifier_content folder on your desktop. The following popup will appear and show your progress:
Move the .md5 files in the identifier_content folder to the identifier_metadata folder on the desktop.
Viewing a Disk Image or Media Item
- Open IsoBuster. If you are viewing a media item, continue to step two. If you are viewing a disk image, click File -> Open Image File and select your image file.
- If viewing an item directly, in the drop-down menu on top (outlined by the blue box in the image below), select the drive you are using. Once the disc drive is selected, the disc’s directory structure will appear in the left-hand menu.
- The red arrow indicates the type of item. You can navigate through the disc structure by clicking on the directories in the left menu. The contents of the active directory (the one you most recently clicked on, marked in orange on the right) will appear on the right. In the below view, the directory “RINEBOLD” (in orange box on left) is active, and the right side displays the contents of that directory. The yellow box contains the file systems present on the disc.
Troubleshooting Potential Errors
Troubleshooting steps for reading an item might include:
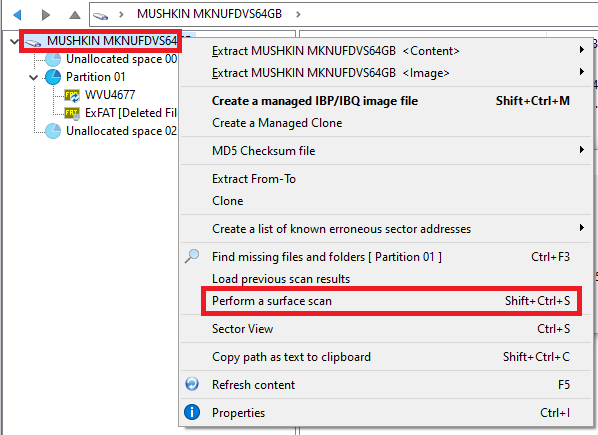
Conducting a surface scan by right clicking on the media item in IsoBuster and selecting Perform a surface scan (see below).
After the scan is done, IsoBuster gives you more information on the state of your item. If everything’s good, the message “No physical errors encountered. Your -item_type- is still in good shape.” will show up. Otherwise, IsoBuster generates a report showing you the readability of the disk (in percentage). Use the floppy disk icon to save the report to the identifier_metadata folder.
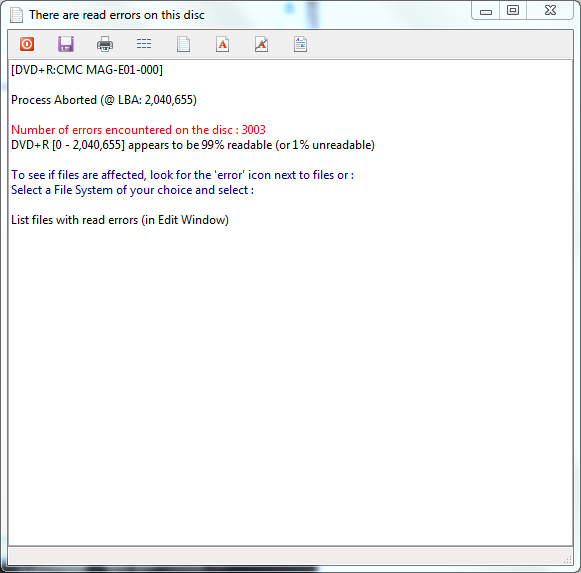
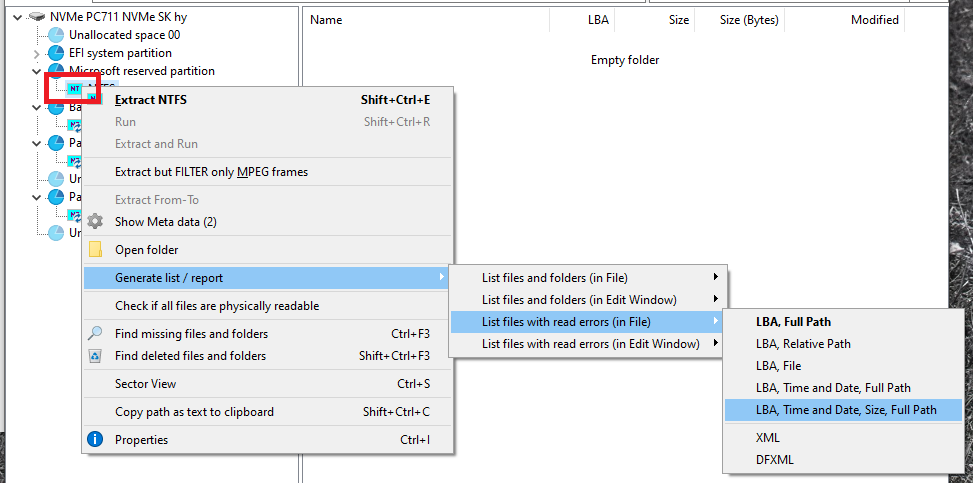
You can launch a more detailed report by right-clicking on the File System Icon (boxed in red) -> Generate list/report -> List files with read errors (in File) -> LBA, Time and Date, Size, Full Path. Save the report in the identifier_metdata folder for the item.
Depending on the results from the two previous analysis, you can either proceed to the extraction of the disk image or identify that the item cannot be disk imaged in the PREMIS spreadsheet. Save the errors logs to the identifier_metadata folder on the desktop and be sure to save the logs to the Metdata folder for the collection in a folder named with the item’s identifier.
HFS Explorer
This section is in progress and will incorporate usage of HFS Explorer to address Mac file system challenges
Exact Audio Copy
Extracting Content
- Open Exact Audio Copy.
Confirm Secure Mode by selecting EAC and then Drive Options from the dropdown. Secure mode must be confirmed at the beginning of each imaging session but does not need to be confirmed between discs.

- A warning may appear notifying you that secure mode options depend on your CD-ROM drive. Select OK and proceed.
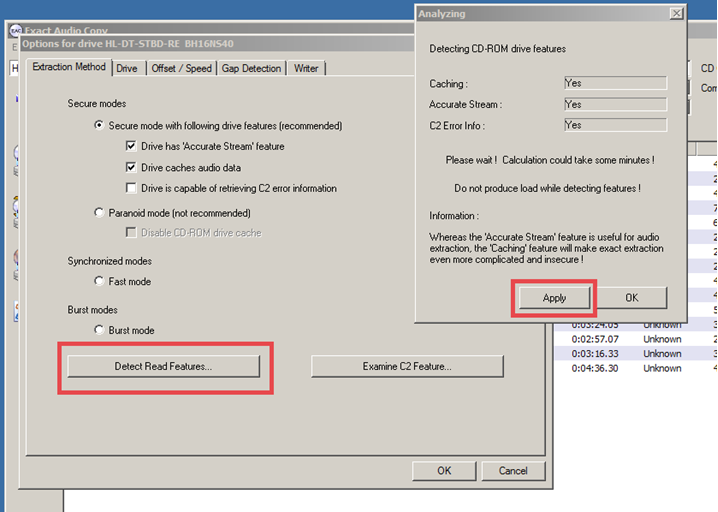
Select Detect Read Features… A window will appear and detect CD-ROM drive features. Once the analysis is complete select Apply at the bottom of the window (see screenshot below). Select OK if necessary.
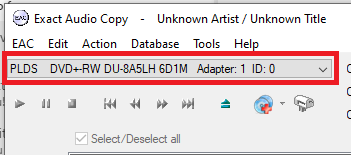
In the drop-down menu at the top of the program (outlined in red below), select the drive you are using. This is usually D: but can be another drive if you are using an external disc drive.
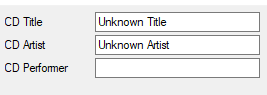
Fill in CD Title (seen below) with the item’s identifier. Delete the content from CD Artist.
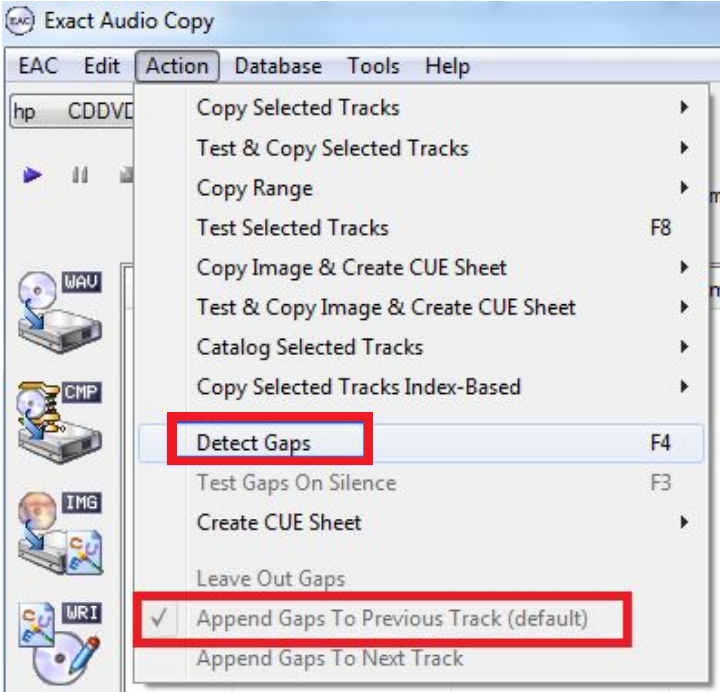
Click on the Action menu and select Detect Gaps. Once detected, Exact Audio Copy should preserve these gaps; make sure “Append gaps to previous track” is checked to enable this (in red). The gaps may represent important timing information in art performances.
On the left side menu, select the Copy Image and Cue Sheet icon (seen below) and navigate to the identifier_content folder for storing content.
- Once copying is complete, select OK.
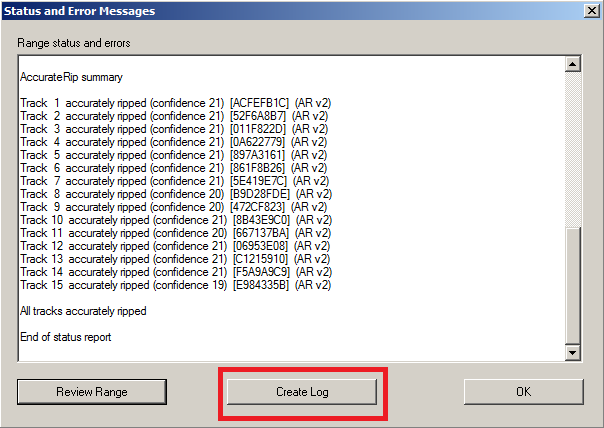
A dialog box will appear with Status and Error Messages. Select Create Log at the bottom. Save the log file with item’s identifier in the identifier_metadata folder for the item.
Teracopy
These instructions are applicable to TeraCopy 3.9.2.
- Select and right click on the folder(s) or individual files ready for transfer.
- Select “Teracopy…” and the Teracopy window should automatically open.
- If it does not automatically open, search for Teracopy from the start menu and open app. When you open Teracopy your files should be loaded and ready for transfer.
- Confirm that all selected files and folders you want to move are listed in the File List tab. The directory you plan to move is listed as the “Source.”
- Check that the dropdown in the upper right corner is set to “On finish: keep app open”.
- Click the “Target” button. Select the location where you would like to move the files to—this is usually the folder for the media item within the content folder of the folder for the collection on the Z: drive.
Click “Copy”.
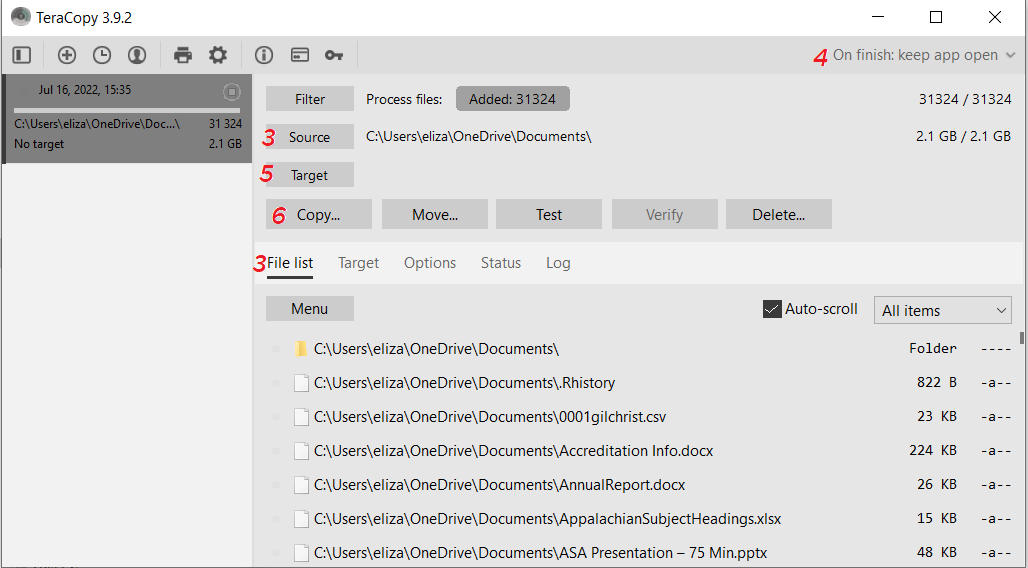
The graphic above is a screenshot of TeraCopy. Each number in red corresponds to the steps outlined above and represents a button/area to check or click for steps 3-6. For instance, a red 3 means that the area should be checked/clicked in step 3.
- Click the “Verify” button to verify the copying process was completed accurately. Click on the Log tab to double check that no errors occurred.
After transfer and verification is complete return to the File List tab and click on “Menu” and “Print/export…” and export a CSV file. The CSV File will be in the User/Documents/Teracopy/Reports folder with the file name as the date and time of transfer. Change the CSV file name to A&MNumber_YYYY-MM-DD_Log.csv and move the CSV to the logs folder within the administration folder of the folder for the collection on the Z: drive.
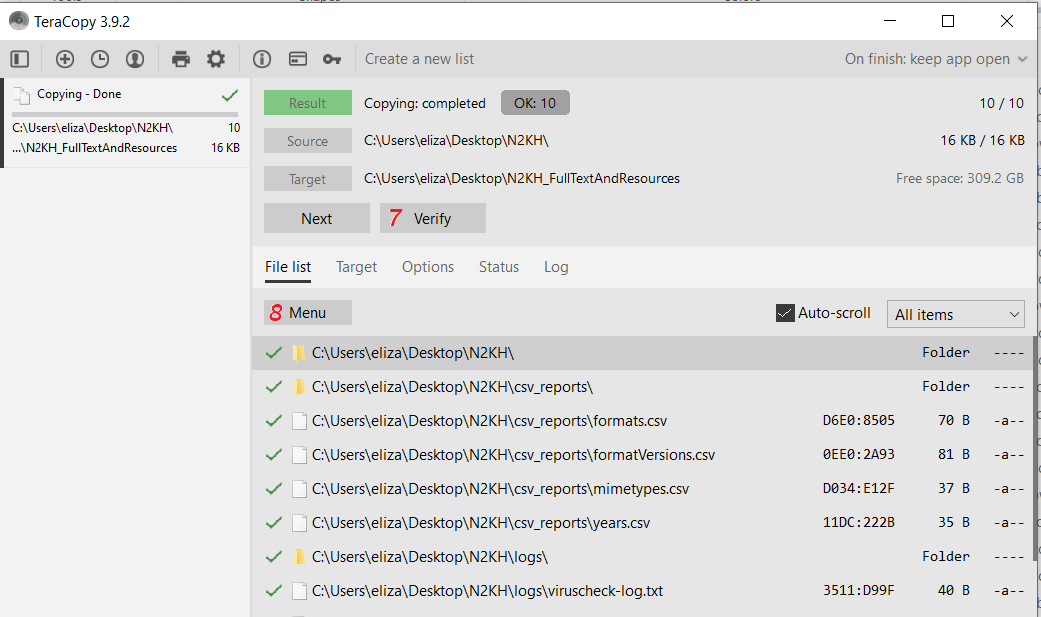
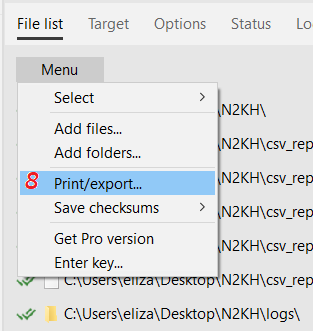
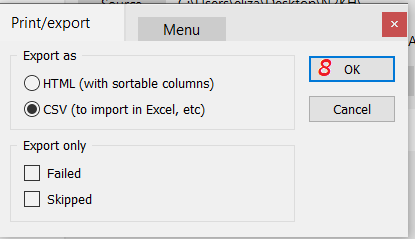
Steps 7 and 8 are marked above in red.
Command Line Tools
Tree
Section in progress, baseline documentation below:
tree /a [input directory] > [output.txt or output.csv file]. An optional flag of /f may be used after /a (be sure to include a space between) to list all files if desired.
Brunnhilde
Section in progress, baseline documentation below:
brunnhilde.py -b -z --ssn_mode=2 [input directory, or content folder for collection] [output directory, or File Metadata folder for collection]
Create file manifest by opening the command prompt and run:
Sf -csv [path to media] > [path to Metadata folder][CUID].csv
Bagger
Section in progress, evaluating:
- https://archives.ncdcr.gov/government/digital-records/north-carolina-digital-repository/bagger-gui-user-guide